Category Archives: Uncategorized

Salesforce is Retiring the OAuth Username/Password Flow: What Your API Integrations Need to Change

If you have some old code quietly connecting to Salesforce with a client ID, client secret, username and password, you have a deadline coming.

Salesforce is retiring the OAuth 2.0 Username-Password Flow for Connected Apps on 20 February 2027. Once the release update is enforced, integrations which still authenticate using grant_type=password will simply stop authenticating. Newer Salesforce orgs are already affected, with the flow disabled for orgs created from Summer ’26 onward.

This is particularly relevant to the enormous pile of unattended integrations written over the last decade or so. Scripts, Laravel applications, scheduled jobs, middleware and little bits of glue code often use the Username-Password Flow precisely because it was so easy: store four or five values in environment variables, POST them to Salesforce, get an access token, and get on with doing useful work.

Unfortunately, that simplicity came with a fairly obvious security problem: your application has to store an actual Salesforce user’s password.

For most server-to-server integrations, the replacement you probably want is the OAuth Client Credentials Flow. Instead of storing a Salesforce username and password, your application authenticates using its own client ID and client secret, and Salesforce runs the connection as a nominated integration user.

There is also the JWT Bearer Flow, which is useful where you’d rather authenticate using a private key and certificate rather than a long-lived shared client secret.

For applications where an actual human is authorising access to their Salesforce account, Salesforce recommends the Web Server / Authorization Code flow with PKCE instead. That’s a different use case to the unattended Laravel applications and cron jobs I’m mainly talking about here.

So, the short version is:

If your Salesforce integration sends grant_type=password, you need to change it.

And if you’re using an older Salesforce PHP package, changing the Salesforce configuration may only be half the job.

What is actually being retired?

The old OAuth Username-Password Flow looks roughly like this:

Application
    |
    | client_id
    | client_secret
    | username
    | password
    v
Salesforce OAuth endpoint
    |
    | access_token
    v
Salesforce REST API

Unlike most OAuth flows there is no browser redirect, authorization page or refresh token. Your application simply sends a Salesforce username and password directly to the token endpoint.

Salesforce has considered this flow insecure for some time. It requires the application to know and store the user’s actual credentials, and doesn’t fit particularly well with things like MFA. Salesforce’s current documentation recommends using it only for special scenarios and explicitly recommends Client Credentials or Web Server + PKCE instead.

The deadline is now quite concrete:

20 February 2027.

This isn’t the same thing as Salesforce’s broader move away from legacy Connected Apps. Existing Connected Apps can continue functioning, but Salesforce is separately moving to External Client Apps, and Connected Apps reach end-of-support in Summer ’27. At that point Salesforce says they will continue working, but fixes and support for the framework and its authorization flows will end.

If you’re changing an integration now, therefore, it makes sense to fix both problems at once and use an External Client App rather than building something new around the legacy Connected App framework.

What the old request looks like

A typical Username-Password Flow request looks something like:

export SF_LOGIN_URL="https://login.salesforce.com"
export SF_CLIENT_ID="your-consumer-key"
export SF_CLIENT_SECRET="your-consumer-secret"
export SF_USERNAME="integration@example.com"
export SF_PASSWORD="your-password"
export SF_SECURITY_TOKEN="your-security-token"

curl -sS -X POST \
    "$SF_LOGIN_URL/services/oauth2/token" \
    -H 'Content-Type: application/x-www-form-urlencoded' \
    --data-urlencode 'grant_type=password' \
    --data-urlencode "client_id=$SF_CLIENT_ID" \
    --data-urlencode "client_secret=$SF_CLIENT_SECRET" \
    --data-urlencode "username=$SF_USERNAME" \
    --data-urlencode "password=${SF_PASSWORD}${SF_SECURITY_TOKEN}"

The security token isn’t always required, depending on your Salesforce network and login configuration, but where it is required Salesforce expects it to be concatenated onto the end of the password.

A successful response contains values along these lines:

{
    "access_token": "00D...",
    "instance_url": "https://example.my.salesforce.com",
    "id": "https://login.salesforce.com/id/00D.../005...",
    "token_type": "Bearer"
}

You then use that token for API calls:

curl -sS \
    "$SF_INSTANCE_URL/services/data/v68.0/query/?q=SELECT+Id,Name+FROM+Account+LIMIT+10" \
    -H "Authorization: Bearer $SF_ACCESS_TOKEN"

The REST API part of your application doesn’t fundamentally change when you move to another OAuth flow. What changes is how you obtain that bearer token.

That distinction becomes quite useful when looking at existing PHP libraries.

Option 1: Client Credentials

For a normal server-to-server integration, this is probably the simplest replacement.

Instead of this:

client ID + secret + Salesforce username + Salesforce password

you have:

client ID + secret
                 |
                 v
       External Client App
                 |
                 v
       nominated Run As user

There is still a Salesforce user involved because Salesforce needs a security context in which to execute your API calls, but your application no longer authenticates by pretending to log in as that user.

You configure the Run As or integration user within Salesforce and give that account only the permissions the integration actually requires. Salesforce specifically recommends using an API-only integration user where appropriate.

Creating the External Client App

In Salesforce Setup, create an External Client App and enable OAuth.

Enable the Client Credentials Flow, assign the appropriate OAuth scopes, and configure the integration user that the client will run as.

For an integration using the REST API you’ll normally require at least the API scope, with the actual Salesforce object and field permissions controlled by the integration user’s profile and permission sets.

One important difference from the old flow is the URL you authenticate against.

For Client Credentials, Salesforce specifically says that login.salesforce.com and test.salesforce.com are not supported. You need to send the request to your My Domain URL instead.

For example:

export SF_DOMAIN="https://mycompany.my.salesforce.com"
export SF_CLIENT_ID="your-consumer-key"
export SF_CLIENT_SECRET="your-consumer-secret"

Salesforce supports two ways of presenting the client credentials.

Client Credentials using POST parameters

This is probably the most obvious translation of the old code:

curl -sS -X POST \
    "$SF_DOMAIN/services/oauth2/token" \
    -H 'Content-Type: application/x-www-form-urlencoded' \
    --data-urlencode 'grant_type=client_credentials' \
    --data-urlencode "client_id=$SF_CLIENT_ID" \
    --data-urlencode "client_secret=$SF_CLIENT_SECRET"

That’s it.

No username.

No password.

No Salesforce security token.

A successful response gives you an access token and instance URL which can be used for the REST API exactly as before.

Client Credentials using HTTP Basic authentication

Salesforce also allows the client ID and secret to be supplied using HTTP Basic authentication rather than putting them into the request body.

With curl that’s even simpler:

curl -sS -X POST \
    "$SF_DOMAIN/services/oauth2/token" \
    -u "$SF_CLIENT_ID:$SF_CLIENT_SECRET" \
    -H 'Content-Type: application/x-www-form-urlencoded' \
    --data-urlencode 'grant_type=client_credentials'

curl -u creates the appropriate HTTP Authorization: Basic ... header for you.

I prefer this form simply because it separates the client authentication from the OAuth request parameters, although both are supported by Salesforce.

There is no refresh token with Client Credentials. If your access token expires, the application simply authenticates again using the client credentials and obtains another one.

For an unattended service this is actually pleasantly simple.

Option 2: JWT Bearer authentication

Client Credentials still gives you a long-lived secret which can obtain a Salesforce access token if somebody gets hold of it.

If you’d prefer asymmetric authentication, Salesforce also supports the OAuth JWT Bearer Flow for server-to-server integrations.

This works differently:

Laravel application
      |
      | signs short-lived JWT
      | using private key
      v
Salesforce
      |
      | verifies signature
      | using public certificate
      v
access token

Your private key stays on the application server. Salesforce only needs the public certificate.

That means there is no reusable password or client secret being transmitted during authentication.

The JWT contains, amongst other things, your OAuth client ID as the issuer, the Salesforce user as the subject, the Salesforce authorization server as the audience, and a short expiry time. Salesforce requires the assertion to be signed using RSA SHA-256.

A rough shell example looks like this.

First, assuming you’ve already created an RSA private key and uploaded its corresponding X.509 certificate to your External Client App:

export SF_CLIENT_ID="your-consumer-key"
export SF_USERNAME="integration@example.com"
export SF_AUTH_URL="https://login.salesforce.com"
export SF_PRIVATE_KEY="./salesforce.key"

Then create a short-lived JWT:

b64url()
{
    openssl base64 -A | tr '+/' '-_' | tr -d '='
}

HEADER=$(printf '%s' '{"alg":"RS256"}' | b64url)

EXP=$(($(date +%s) + 180))

PAYLOAD=$(
    jq -nc \
        --arg iss "$SF_CLIENT_ID" \
        --arg sub "$SF_USERNAME" \
        --arg aud "$SF_AUTH_URL" \
        --argjson exp "$EXP" \
        '{iss:$iss,sub:$sub,aud:$aud,exp:$exp}'
)

PAYLOAD=$(printf '%s' "$PAYLOAD" | b64url)

SIGNATURE=$(
    printf '%s' "$HEADER.$PAYLOAD" |
        openssl dgst -sha256 -sign "$SF_PRIVATE_KEY" -binary |
        b64url
)

JWT="$HEADER.$PAYLOAD.$SIGNATURE"

And exchange it for an access token:

curl -sS -X POST \
    "$SF_AUTH_URL/services/oauth2/token" \
    -H 'Content-Type: application/x-www-form-urlencoded' \
    --data-urlencode \
        'grant_type=urn:ietf:params:oauth:grant-type:jwt-bearer' \
    --data-urlencode \
        "assertion=$JWT"

Salesforce validates the signature against the certificate registered with the application and, assuming the user/application has already been authorised appropriately, returns a normal OAuth bearer token. The JWT Bearer Flow doesn’t issue a refresh token either.

There are some additional setup details around pre-authorisation, certificate rotation and the exact audience value, particularly if you’re using My Domain or an Experience Cloud domain, so this is one place where I’d strongly suggest checking Salesforce’s current JWT documentation rather than blindly copying an old example from Stack Overflow.

The important distinction is that the private key never needs to leave your application server.

What about Web Server Flow and PKCE?

Salesforce’s release notice actually gives two primary recommendations.

For end-user login and authorization, use the Web Server Flow with PKCE.

For server-to-server integrations, use Client Credentials.

If you have a Laravel application where users click something like Connect Salesforce, get sent to Salesforce, approve access, and then come back to your application, you should be looking at Authorization Code + PKCE rather than Client Credentials.

That’s roughly:

Browser
   |
   v
Salesforce authorization page
   |
   | authorization code
   v
Laravel callback
   |
   | code + PKCE verifier
   v
Salesforce token endpoint
   |
   v
access token / refresh token

That’s a substantially different problem from a backend service account running a scheduled sync every five minutes.

For the latter, adding browser redirects merely to replace grant_type=password would be solving the wrong problem.

And then there’s Laravel…

This is where things get a bit more interesting.

A number of PHP Salesforce libraries were written when the Username-Password Flow was an entirely normal way of connecting an unattended application to Salesforce.

One example is ae/salesforce-rest-sdk.

Its own documentation shows the normal client being constructed like this:

use AE\SalesforceRestSdk\Rest\Client;
use AE\SalesforceRestSdk\AuthProvider\OAuthProvider;

$client = new Client(
    new OAuthProvider(
        'SF_CLIENT_ID',
        'SF_CLIENT_SECRET',
        'https://login.salesforce.com',
        'SF_USER',
        'SF_PASS'
    )
);

And unfortunately, that isn’t just an old README example.

At the time of writing, the OAuthProvider itself defines only:

public const GRANT_PASSWORD = "password";
public const GRANT_CODE = "authorization_code";

and defaults to GRANT_PASSWORD. Its password branch explicitly POSTs grant_type, client_id, client_secret, username and password to /services/oauth2/token.

So changing your Salesforce configuration from Username-Password to Client Credentials and deleting SALESFORCE_USERNAME from .env is not enough.

The library doesn’t currently know how to perform the Client Credentials grant.

The good news is that you don’t have to throw the rest of the SDK away.

The AuthProvider interface makes migration relatively painless

Internally, ae/salesforce-rest-sdk‘s REST client depends on AuthProviderInterface, rather than explicitly requiring OAuthProvider.

That interface mostly needs to be able to:

authorize();
reauthorize();
revoke();

getToken();
getTokenType();
getInstanceUrl();
getIdentity();
isAuthorized();

The REST client asks the provider for an authorization header and an instance URL, then gets on with doing REST things.

It even automatically calls reauthorize() and retries the request when Salesforce responds with a 401.

That means one migration path is simply to write a small Client Credentials provider.

For example:

<?php

namespace App\Services\Salesforce;

use AE\SalesforceRestSdk\AuthProvider\AuthProviderInterface;
use GuzzleHttp\Client;

class ClientCredentialsProvider implements AuthProviderInterface
{
    protected Client $http;

    protected ?string $token = null;
    protected ?string $instanceUrl = null;
    protected string $tokenType = 'Bearer';

    public function __construct(
        protected string $clientId,
        protected string $clientSecret,
        string $salesforceDomain
    ) {
        $this->http = new Client([
            'base_uri' => rtrim($salesforceDomain, '/'),
        ]);
    }

    public function authorize()
    {
        if ($this->token !== null) {
            return "{$this->tokenType} {$this->token}";
        }

        $response = $this->http->post(
            '/services/oauth2/token',
            [
                'auth' => [
                    $this->clientId,
                    $this->clientSecret,
                ],
                'form_params' => [
                    'grant_type' => 'client_credentials',
                ],
                'headers' => [
                    'Accept' => 'application/json',
                ],
            ]
        );

        $data = json_decode(
            (string) $response->getBody(),
            true
        );

        $this->token = $data['access_token'];
        $this->tokenType = $data['token_type'] ?? 'Bearer';
        $this->instanceUrl = $data['instance_url'];

        return "{$this->tokenType} {$this->token}";
    }

    public function reauthorize()
    {
        $this->token = null;

        return $this->authorize();
    }

    public function revoke()
    {
        $this->token = null;
        $this->instanceUrl = null;
    }

    public function getIdentity(): array
    {
        return [];
    }

    public function getToken(): ?string
    {
        return $this->token;
    }

    public function getTokenType(): ?string
    {
        return $this->tokenType;
    }

    public function isAuthorized(): bool
    {
        return $this->token !== null;
    }

    public function getInstanceUrl(): ?string
    {
        return $this->instanceUrl;
    }
}

Then your existing Salesforce client can remain almost completely unchanged:

use AE\SalesforceRestSdk\Rest\Client;
use App\Services\Salesforce\ClientCredentialsProvider;

$provider = new ClientCredentialsProvider(
    config('services.salesforce.client_id'),
    config('services.salesforce.client_secret'),
    config('services.salesforce.domain')
);

$salesforce = new Client(
    $provider,
    config('services.salesforce.api_version')
);

And your Laravel configuration might look something like:

// config/services.php

return [

    // ...

    'salesforce' => [
        'domain' => env('SALESFORCE_DOMAIN'),
        'client_id' => env('SALESFORCE_CLIENT_ID'),
        'client_secret' => env('SALESFORCE_CLIENT_SECRET'),
        'api_version' => env('SALESFORCE_API_VERSION'),
    ],

];

with:

SALESFORCE_DOMAIN=https://mycompany.my.salesforce.com
SALESFORCE_CLIENT_ID=...
SALESFORCE_CLIENT_SECRET=...
SALESFORCE_API_VERSION=68.0

No Salesforce username or password needs to live in the Laravel application’s environment any more.

You could bind the Salesforce client into Laravel’s service container as a singleton if it’s used extensively throughout the application.

The same general approach applies to other Laravel Salesforce packages: find the part which obtains the access token.

If the package supports client_credentials, fantastic. Change the configuration and you’re probably nearly done.

If it exposes an authentication-provider interface, write a provider.

If OAuth is deeply baked into the package and grant_type=password is hard-coded, you may need to upgrade, fork or replace it.

What you generally shouldn’t do is rewrite every Salesforce query in your application just because its authentication mechanism changed.

One other thing to check while you’re in there

ae/salesforce-rest-sdk is showing its age in a few other places.

The latest official ae/salesforce-rest-sdk release on Packagist is still 2.0.1 from April 2020, requiring PHP 7.2, Guzzle 6 and Symfony 4/5 components.

Its REST client also defaults to Salesforce API version 44.0 unless you explicitly specify a version.

API v44.0 is still supported at the time of writing, but Salesforce’s API retirement policy means old versions don’t live forever. Salesforce currently lists versions 41.0 through 68.0 as supported.

So if you’re already touching a six-year-old Salesforce integration to fix OAuth, it’s worth checking which REST API version it is actually using rather than blindly preserving another historical default.

You can ask Salesforce what versions are available with:

curl -sS \
    "$SF_INSTANCE_URL/services/data/" \
    -H "Authorization: Bearer $SF_ACCESS_TOKEN"

Then deliberately configure a supported API version your application has been tested against.

Which flow should I choose?

For the sorts of integrations I tend to deal with, the decision is reasonably straightforward:

  1. Scheduled job, Laravel backend, middleware or system-to-system sync: use Client Credentials unless you have a particular reason not to.
  2. Higher-security server-to-server integration where you want asymmetric credentials: consider JWT Bearer.
  3. A user explicitly connects their own Salesforce account to your application: use Authorization Code / Web Server Flow with PKCE.
  4. Anything still using grant_type=password: put it on the migration list now.
  5. Anything creating a new Connected App: use an External Client App instead unless you have a specific legacy requirement.

The nice thing is that for most server-to-server REST integrations the big scary OAuth migration isn’t actually that big.

Your SOQL doesn’t change.

Your SObjects don’t change.

Your REST endpoints don’t change.

Your business logic doesn’t change.

You’re replacing the small piece of code which obtains the bearer token.

The potentially dangerous part is assuming that because a PHP or Laravel Salesforce package still works today, its authentication method is going to continue working next year.

The date to remember

20 February 2027.

After that date, Salesforce’s OAuth Username-Password Flow for Connected Apps is gone.

If you have an integration containing something resembling:

$clientId,
$clientSecret,
$username,
$password

or:

grant_type=password

now would be an excellent time to work out why.

Because on 19 February it’ll still look like a boring piece of code which has quietly run for years.

On 20 February it may become a considerably more interesting piece of code.
Useful Links

Provisioning a Galera Cluster on Ubuntu 18.04

So, we want to bring up a Galera cluster, and do some basic testing of how to bring it back online should things go pear shaped

First, install MariaDB on all three nodes

# apt-get install software-properties-common
# apt-key adv --recv-keys --keyserver hkp://keyserver.ubuntu.com:80 0xF1656F24C74CD1D8
# add-apt-repository "deb [arch=amd64,arm64,ppc64el] http://mariadb.mirror.liquidtelecom.com/repo/10.4/ubuntu $(lsb_release -cs) main"
# apt update
# apt -y install mariadb-server mariadb-client

At this point mariadb is installed, but has no root password configured.

# mysql_secure_installation
 NOTE: RUNNING ALL PARTS OF THIS SCRIPT IS RECOMMENDED FOR ALL MariaDB
       SERVERS IN PRODUCTION USE!  PLEASE READ EACH STEP CAREFULLY!
 In order to log into MariaDB to secure it, we'll need the current
 password for the root user. If you've just installed MariaDB, and
 haven't set the root password yet, you should just press enter here.
 Enter current password for root (enter for none): 
 OK, successfully used password, moving on…
 Setting the root password or using the unix_socket ensures that nobody
 can log into the MariaDB root user without the proper authorisation.
 You already have your root account protected, so you can safely answer 'n'.
 Switch to unix_socket authentication [Y/n] 
 Enabled successfully!
 Reloading privilege tables..
  … Success!
 You already have your root account protected, so you can safely answer 'n'.
 Change the root password? [Y/n] y
 New password: 
 Re-enter new password: 
 Password updated successfully!
 Reloading privilege tables..
  … Success!
 By default, a MariaDB installation has an anonymous user, allowing anyone
 to log into MariaDB without having to have a user account created for
 them.  This is intended only for testing, and to make the installation
 go a bit smoother.  You should remove them before moving into a
 production environment.
 Remove anonymous users? [Y/n] y
  … Success!
 Normally, root should only be allowed to connect from 'localhost'.  This
 ensures that someone cannot guess at the root password from the network.
 Disallow root login remotely? [Y/n] y
  … Success!
 By default, MariaDB comes with a database named 'test' that anyone can
 access.  This is also intended only for testing, and should be removed
 before moving into a production environment.
 Remove test database and access to it? [Y/n] y
 Dropping test database…
 … Success!
 Removing privileges on test database…
 … Success! 
 Reloading the privilege tables will ensure that all changes made so far
 will take effect immediately.
 Reload privilege tables now? [Y/n] y
  … Success!
 Cleaning up…
 All done!  If you've completed all of the above steps, your MariaDB
 installation should now be secure.
 Thanks for using MariaDB!

Do this on both servers, and you’re now ready to configure the Galera Cluster portion! On each node, you want to create a /etc/mysql/mariadb.conf.d/galera.cnf file:

# cat /etc/mysql/mariadb.conf.d/galera.cnf
[mysqld]
character-set-server = utf8
character_set_server = utf8
bind-address=0.0.0.0
port=3306
default_storage_engine=InnoDB
binlog_format=row
innodb_autoinc_lock_mode=2
# Galera cluster configuration
wsrep_on=ON
wsrep_provider=/usr/lib/galera/libgalera_smm.so
wsrep_cluster_address="gcomm://192.168.1.201,192.168.1.202,192.168.1.203"
wsrep_cluster_name="galera-cluster-1"
wsrep_sst_method=rsync
# Cluster node configuration
wsrep_node_address="192.168.1.201"
wsrep_node_name="galera-host-01"

#

The only difference between this file on each node is the last two lines – wsrep_node_address, and wsrep_node_name. note: You’ll probably want to have hosts file entries on your nodes to map IP’s to names and vice versa, unless you have reliable DNS configured internally, as it affects your cluster status displays.
Your wsrep_cluster_address line will have the IP’s of your cluster nodes.

Stop MariaDB on all nodes, and boot galera on the first node:

node2# systemctl stop mariadb
node3# systemctl stop mariadb
node1# systemctl stop mariadb
node1# galera_new_cluster

Your cluster should now have started. Lets check the cluster state.

root@galera-host-01:~# mysql -e "show status like 'wsrep_%'"
 
+-------------------------------+------------------------------------------------
| Variable_name                 | Value                               +-------------------------------+------------------------------------------------
 | wsrep_local_state_uuid        | fd6dbdcc-c95e-11e9-ac52-570534ceb766           
 | wsrep_protocol_version        | 10  
 | wsrep_last_committed          | 1 
 | wsrep_replicated              | 0 
 | wsrep_replicated_bytes        | 0 
 | wsrep_repl_keys               | 0 
 | wsrep_repl_keys_bytes         | 0 
 | wsrep_repl_data_bytes         | 0 
 | wsrep_repl_other_bytes        | 0 
 | wsrep_received                | 2 
 | wsrep_received_bytes          | 144 
 | wsrep_local_commits           | 0  
 | wsrep_local_cert_failures     | 0  
 | wsrep_local_replays           | 0 
 | wsrep_local_send_queue        | 0 
 | wsrep_local_send_queue_max    | 1 
 | wsrep_local_send_queue_min    | 0 
 | wsrep_local_send_queue_avg    | 0 
 | wsrep_local_recv_queue        | 0 
 | wsrep_local_recv_queue_max    | 1 
 | wsrep_local_recv_queue_min    | 0 
 | wsrep_local_recv_queue_avg    | 0  
 | wsrep_local_cached_downto     | 1 
 | wsrep_flow_control_paused_ns  | 0 
 | wsrep_flow_control_paused     | 0 
 | wsrep_flow_control_sent       | 0 
 | wsrep_flow_control_recv       | 0 
 | wsrep_cert_deps_distance      | 0 
 | wsrep_apply_oooe              | 0 
 | wsrep_apply_oool              | 0 
 | wsrep_apply_window            | 0 
 | wsrep_commit_oooe             | 0 
 | wsrep_commit_oool             | 0 
 | wsrep_commit_window           | 0 
 | wsrep_local_state             | 4 
 | wsrep_local_state_comment     | Synced 
 | wsrep_cert_index_size         | 0 
 | wsrep_causal_reads            | 0 
 | wsrep_cert_interval           | 0 
 | wsrep_open_transactions       | 0 
 | wsrep_open_connections        | 0 
 | wsrep_incoming_addresses      | AUTO 
 | wsrep_cluster_weight          | 1 
 | wsrep_desync_count            | 0 
 | wsrep_evs_delayed             |  
 | wsrep_evs_evict_list          |  
 | wsrep_evs_repl_latency        | 0/0/0/0/0 
 | wsrep_evs_state               | OPERATIONAL 
 | wsrep_gcomm_uuid              | fd6cf1bd-c95e-11e9-98ab-d2e5733d21d0           
 | wsrep_applier_thread_count    | 1 
 | wsrep_cluster_capabilities    |  
 | wsrep_cluster_conf_id         | 18446744073709551615 
 | wsrep_cluster_size            | 1
 | wsrep_cluster_state_uuid      | fd6dbdcc-c95e-11e9-ac52-570534ceb766           
 | wsrep_cluster_status          | Primary  
 | wsrep_connected               | ON  
 | wsrep_local_bf_aborts         | 0  
 | wsrep_local_index             | 0  
 | wsrep_provider_capabilities   | :MULTI_MASTER:CERTIFICATION:PARALLEL_APPLYING:T
 | wsrep_provider_name           | Galera 
 | wsrep_provider_vendor         | Codership Oy <info@codership.com>
 | wsrep_provider_version        | 26.4.2(r4498) 
 | wsrep_ready                   | ON   
 | wsrep_rollbacker_thread_count | 2 
 | wsrep_thread_count            | 3 
 +-------------------------------+------------------------------------------------ 

Check the cluster size to make sure the cluster came up – it should be a cluster of one right now

root@galera-host-01:~# mysql -e "show status like 'wsrep_cluster_size'"
Enter password: 
+--------------------+-------+
| Variable_name      | Value |
+--------------------+-------+
| wsrep_cluster_size | 1     |
+--------------------+-------+

This looks good – time to boot the second server

galera-host-02# systemctl start mariadb

Check the cluster size again – it should now be 2

root@galera-host-01:~# mysql -u root -p -e "show status like 'wsrep_cluster_size'"
Enter password: 
+--------------------+-------+
| Variable_name      | Value |
+--------------------+-------+
| wsrep_cluster_size | 2     |
+--------------------+-------+

Start node3, and you’ll see the node size at 3. Nice.

Cluster monitoring for HAProxy

Having a cluster is no good if you don’t have your client machines load balancing across them, and only talking to ‘up’ servers.

For this you need a way for HAProxy to know the state of each server. I like the ‘clustercheck’ script from obissick. (https://github.com/obissick/Galera-ClusterCheck)

First we add a cluster check user to MySQL.

create user clustercheckuser@'localhost' IDENTIFIED BY 'h3fUU3373Pb17Vjt&^C39hFHelA';
GRANT PROCESS ON *.* TO 'clustercheckuser'@'localhost';

Then Install the clustercheck script, and edit it

curl https://raw.githubusercontent.com/obissick/Galera-ClusterCheck/master/clustercheck.sh > /usr/bin/clustercheck
chmod +x /usr/bin/clustercheck
vi /usr/bin/clustercheck
edit the MYSQL_PASSWORD line to put the password in..
i.e. MYSQL_PASSWORD="${2-h3fUU3373Pb17Vjt&^C39hFHelA}"
apt-get install -y xinetd
echo "mysqlchk 9200/tcp #mysql check script" >> /etc/services
cat > /etc/xinetd.d/mysqlchk << __END__
default: on
description: mysqlchk
service mysqlchk
{
disable = no
flags = REUSE
socket_type = stream
port = 9200
wait = no
user = nobody
server = /usr/bin/clustercheck
log_on_failure += USERID
only_from = 192.168.1.0/24
per_source = UNLIMITED
}
__END__
service xinetd restart

Note: you will want to change the only_from to match any IP’s which will be running haproxy. Deploy the above to all members of your galera cluster.

Now, on each client machine, we can configure a block in haproxy similar to the below:

frontend mysql-dev-front
bind 127.0.0.1:3307
mode tcp
default_backend mysql-dev-back

backend mysql-dev-back
mode tcp
balance leastconn
option tcpka
option httpchk
default-server port 9200 inter 2s downinter 5s rise 3 fall 2 slowstart 60s weight 100
server node1 192.168.1.201:3306 check
server node2 192.168.1.202:3306 check
server node3 192.168.1.203:3306 check

NOTE: Make sure that you can connect to port 9200 on both MySQL servers from your client server BEFORE enabling this config in HAProxy!

curl http://192.168.1.201:9200
Galera Cluster Node is synced.
curl: (56) Recv failure: Connection reset by peer

once this is complete, any applications on your client machine can connect to localhost:3307

Failure Modes

Ok so this is one of the most important things we need to think about. There are a few failure modes we need to be able to handle in the cluster.

One node is shut down

Lets insert some rows into a test database, and then shut down node 2.

root@galera-host-01:~# mysql
Welcome to the MariaDB monitor.  Commands end with ; or \g.
Your MariaDB connection id is 50
Server version: 10.4.7-MariaDB-1:10.4.7+maria~bionic-log mariadb.org binary distribution
Copyright (c) 2000, 2018, Oracle, MariaDB Corporation Ab and others.
Type 'help;' or '\h' for help. Type '\c' to clear the current input statement.

MariaDB [(none)]> create database ninjas;
Query OK, 1 row affected (0.006 sec)
MariaDB [(none)]> use ninjas;
Database changed
MariaDB [ninjas]> create table table1 (row1 integer not null);
Query OK, 0 rows affected (0.013 sec)
MariaDB [ninjas]> insert into table1 values (1), (2), (3), (4), (5), (6);
Query OK, 6 rows affected (0.006 sec)
Records: 6  Duplicates: 0  Warnings: 0

root@galera-host-02:~# mysql ninjas -e "select * from table1;"
 +------+
 | row1 |
 +------+
 |    1 |
 |    2 |
 |    3 |
 |    4 |
 |    5 |
 |    6 |
 +------+
root@galera-host-02:~# systemctl stop mariadb

root@galera-host-01:~# mysql ninjas -e "insert into table1 values (7), (8), (9);"

Ok, so we now have data in the DB since host-02 was shutdown. We’re now going to bring host-02 back up and check that it comes back into the cluster cleanly

root@galera-host-02:~# systemctl start mariadb
root@galera-host-02:~# mysql ninjas -e "select * from table1;"
+------+
| row1 |
+------+
| 1 |
| 2 |
| 3 |
| 4 |
| 5 |
| 6 |
| 7 |
| 8 |
| 9 |
+------+

Perfect.

All the nodes are shut down

And re-started in the correct order

How about where we have to shut down the cluster, and bring it back online? Lets shut down the nodes, first we’ll do reverse order 03, 02, 01, then bring them up 01, 02, 03. (Yes, That’s the way you’re meant to do it. We’re going to do it wrong soon, and see how to recover from that..)

root@galera-host-03:~# systemctl stop mariadb
root@galera-host-02:~# systemctl stop mariadb
root@galera-host-01:~# systemctl stop mariadb

If we have a look in /var/lib/mysql/grastate.dat on each host, we’ll see that galera-host-01 is indeed the host we should be booting the cluster from:

root@galera-host-01:~# cat /var/lib/mysql/grastate.dat 
GALERA saved state
version: 2.1
uuid:    a10015aa-cd62-11e9-a80b-87dacc3a89c3
seqno:   11
safe_to_bootstrap: 1

root@galera-host-02:~# cat /var/lib/mysql/grastate.dat 
GALERA saved state
version: 2.1
uuid:    a10015aa-cd62-11e9-a80b-87dacc3a89c3
seqno:   10
safe_to_bootstrap: 0

root@galera-host-03:~# cat /var/lib/mysql/grastate.dat 
GALERA saved state
version: 2.1
uuid:    a10015aa-cd62-11e9-a80b-87dacc3a89c3
seqno:   9
safe_to_bootstrap: 0

Ok, so we should simply be able to boot the cluster by running galera_new_cluster on galera-host-01, and then starting the other hosts

root@galera-host-01:~# galera_new_cluster
root@galera-host-01:~# mysql -e "show status like 'wsrep_cluster_size'"
+--------------------+-------+
| Variable_name      | Value |
+--------------------+-------+
| wsrep_cluster_size | 1     |
+--------------------+-------+

root@galera-host-02:~# systemctl start mariadb

root@galera-host-01:~# mysql -e "show status like 'wsrep_cluster_size'"
+--------------------+-------+
| Variable_name      | Value |
+--------------------+-------+
| wsrep_cluster_size | 2     |
+--------------------+-------+

root@galera-host-03:~# systemctl start mariadb

root@galera-host-01:~# mysql -e "show status like 'wsrep_cluster_size'"
+--------------------+-------+
| Variable_name      | Value |
+--------------------+-------+
| wsrep_cluster_size | 3     |
+--------------------+-------+

Restarting the cluster in the wrong order

Ok now lets shut it down with host 01 first, and then boot it from host01 first. So, we’re going to shut down the nodes, and then check our galera replication state files

root@galera-host-01:~# systemctl stop mariadb
root@galera-host-02:~# systemctl stop mariadb
root@galera-host-03:~# systemctl stop mariadb

root@galera-host-01:~# cat /var/lib/mysql/grastate.dat 
GALERA saved state
version: 2.1
uuid:    a10015aa-cd62-11e9-a80b-87dacc3a89c3
seqno:   15
safe_to_bootstrap: 0

root@galera-host-02:~# cat /var/lib/mysql/grastate.dat 
GALERA saved state
version: 2.1
uuid:    a10015aa-cd62-11e9-a80b-87dacc3a89c3
seqno:   16
safe_to_bootstrap: 0

root@galera-host-03:~# cat /var/lib/mysql/grastate.dat 
GALERA saved state
version: 2.1
uuid:    a10015aa-cd62-11e9-a80b-87dacc3a89c3
seqno:   17
safe_to_bootstrap: 1

Yep, so host-03 would be the correct host to start. But we’re going to start host-01.

root@galera-host-01:~# galera_new_cluster 
 Job for mariadb.service failed because the control process exited with error code.
 See "systemctl status mariadb.service" and "journalctl -xe" for details.

Well, that’s promising. It won’t let us do it. If we check the log, we se:

2019-09-02  9:58:05 0 [Note] WSREP: Start replication
2019-09-02  9:58:05 0 [Note] WSREP: Connecting with bootstrap option: 1
2019-09-02  9:58:05 0 [Note] WSREP: Setting GCS initial position to a10015aa-cd62-11e9-a80b-87dacc3a89c3:15
2019-09-02  9:58:05 0 [ERROR] WSREP: It may not be safe to bootstrap the cluster from this node. It was not the last one to leave the cluster and may not contain all the updates. To force cluster bootstrap with this node, edit the grastate.dat file manually and set safe_to_bootstrap to 1 .
2019-09-02  9:58:05 0 [ERROR] WSREP: wsrep::connect(gcomm://192.168.13.201,192.168.13.202,192.168.13.203) failed: 7
2019-09-02  9:58:05 0 [ERROR] Aborting

Ok. lets make it really bad, lets edit grastate.dat and set safe_to_bootstrap to 1 😀

root@galera-host-01:~# galera_new_cluster 
root@galera-host-01:~# mysql -e "show status like 'wsrep_cluster_size'"
 +--------------------+-------+
 | Variable_name      | Value |
 +--------------------+-------+
 | wsrep_cluster_size | 1     |
 +--------------------+-------+

Ok, promising. Lets start host-02

root@galera-host-02:~# systemctl start mariadb
root@galera-host-01:~# mysql -e "show status like 'wsrep_cluster_size'"
+--------------------+-------+
| Variable_name      | Value |
+--------------------+-------+
| wsrep_cluster_size | 2     |
+--------------------+-------+

Well, that’s beautiful! Ok, lets see what happens when we start host-03, which is still in safe_to_bootstrap in its’ grastate file

root@galera-host-03:~# systemctl start mariadb
root@galera-host-01:~# mysql -e "show status like 'wsrep_cluster_size'"
+--------------------+-------+
| Variable_name      | Value |
+--------------------+-------+
| wsrep_cluster_size | 3     |
+--------------------+-------+

Well, colour me impressed! Are they REALLY in sync?

root@galera-host-01:~# mysql ninjas -e "insert into table1 values (14), (15), (16);"

root@galera-host-02:~# mysql ninjas -e "select * from table1;"
+------+
| row1 |
+------+
|    1 |
|    2 |
|    3 |
|    4 |
|    5 |
|    6 |
|    7 |
|    8 |
|    9 |
|   10 |
|   11 
|   12 |
|   14 |
|   15 |
|   16 |
+------+

root@galera-host-03:~# mysql ninjas -e "select * from table1;"
+------+
| row1 |
+------+
|    1 |
|    2 |
|    3 |
|    4 |
|    5 |
|    6 |
|    7 |
|    8 |
|    9 |
|   10 |
|   11 
|   12 |
|   14 |
|   15 |
|   16 |
+------+

Well bugger me, that looks good!

Rebuilding a failed node

SHOULD you happen to have a node get completely buggered (say you have enough data that the systemd 90 second startup timeout screws you during SST and leaves your node broken), you can need to do a clean setup of MariaDB to get Galera going again.

galera-host-02# apt-get purge mariadb-server-10.4
 Reading package lists… Done
 Building dependency tree       
 Reading state information… Done
 The following packages were automatically installed and are no longer required:
   galera-4 libaio1 libcgi-fast-perl libcgi-pm-perl libfcgi-perl libhtml-template-perl mariadb-server-core-10.4 socat
 Use 'apt autoremove' to remove them.
 The following packages will be REMOVED:
   mariadb-server* mariadb-server-10.4*
 0 upgraded, 0 newly installed, 2 to remove and 0 not upgraded.
 After this operation, 77.7 MB disk space will be freed.
 Do you want to continue? [Y/n] y
 (Reading database … 68199 files and directories currently installed.)
 Removing mariadb-server (1:10.4.7+maria~bionic) …
 Removing mariadb-server-10.4 (1:10.4.7+maria~bionic) …
 Processing triggers for man-db (2.8.3-2ubuntu0.1) …
 (Reading database … 68069 files and directories currently installed.)
 Purging configuration files for mariadb-server-10.4 (1:10.4.7+maria~bionic) …

galera-host-02:~# rm -rf /var/lib/mysql/*
galera-host-02:~# mv /etc/mysql/mariadb.conf.d/galera.cnf /root/galera.cnf

galera-host-02:~# apt -y install mariadb-server mariadb-client
 Reading package lists… Done
 Building dependency tree       
 Reading state information… Done
 mariadb-client is already the newest version (1:10.4.7+maria~bionic).
 Suggested packages:
   mailx mariadb-test tinyca
 The following NEW packages will be installed:
   mariadb-server mariadb-server-10.4
 0 upgraded, 2 newly installed, 0 to remove and 0 not upgraded.
 Need to get 4,627 kB of archives.
 After this operation, 77.7 MB of additional disk space will be used.
 Get:1 http://mariadb.mirror.liquidtelecom.com/repo/10.4/ubuntu bionic/main amd64 mariadb-server-10.4 amd64 1:10.4.7+maria~bionic [4,624 kB]
 Get:2 http://mariadb.mirror.liquidtelecom.com/repo/10.4/ubuntu bionic/main amd64 mariadb-server all 1:10.4.7+maria~bionic [3,180 B]
 Fetched 4,627 kB in 6s (824 kB/s)          
 Preconfiguring packages …
 Selecting previously unselected package mariadb-server-10.4.
 (Reading database … 68059 files and directories currently installed.)
 Preparing to unpack …/mariadb-server-10.4_1%3a10.4.7+maria~bionic_amd64.deb …
 Unpacking mariadb-server-10.4 (1:10.4.7+maria~bionic) …
 Selecting previously unselected package mariadb-server.
 Preparing to unpack …/mariadb-server_1%3a10.4.7+maria~bionic_all.deb …
 Unpacking mariadb-server (1:10.4.7+maria~bionic) …
 Setting up mariadb-server-10.4 (1:10.4.7+maria~bionic) …
 Failed to stop mysql.service: Unit mysql.service not loaded.
 Created symlink /etc/systemd/system/mysql.service → /lib/systemd/system/mariadb.service.
 Created symlink /etc/systemd/system/mysqld.service → /lib/systemd/system/mariadb.service.
 Created symlink /etc/systemd/system/multi-user.target.wants/mariadb.service → /lib/systemd/system/mariadb.service.
 Setting up mariadb-server (1:10.4.7+maria~bionic) …
 Processing triggers for man-db (2.8.3-2ubuntu0.1) …

galera-host-02:~# mysql_secure_installation
......
<snipped>

galera-host-02:~# systemctl stop mariadb
galera-host-02:~# cp /root/galera.cnf /etc/mysql/mariadb.conf.d/
galera-host-02:~# echo 'TimeoutSec=infinity' >> /etc/systemd/system/mysqld.service
galera-host-02:~# systemctl daemon-reload
galera-host-02:~# systemctl start mariadb

And bingo, we’re back in the cluster 🙂

Setting up Docker Swarm in VMware NSX

Setting up Docker Swarm is pretty simple. BUT VMWare NSX is a little annoying, in that it blocks the VXLAN transport port (TCP Port 4789) at the hypervisor level. I’m sure this seemed GREAT for security, but it majorly messes up any application USING VXLAN inside the transport zone. Suck as Docker Swarm inside a cloud provider who uses VMWare NSX. As long as you know about this, you can work around it, however, as you can specify an alternate VXLAN port when you initialize your swarm! So let’s do that!

We will be bringing up a swarm on a cluster today with one manager and four nodes – each host has two network interfaces – we’ll be using ens160 in 10.129.2.0/24 for our transport network. we use the –data-path-port parameter to set the VXLAN port.

Note: Our manager, and all nodes, already need Docker installed, incase this isn’t obvious 😀

root@prod-swarm-manager-1:~# docker swarm init --data-path-port 4788 --advertise-addr 10.129.2.21
 Swarm initialized: current node (p9ojg9edmipi7saldcbrcnhyt) is now a manager.
 
To add a worker to this swarm, run the following command:

    docker swarm join --token SWMTKN-1-42rg6zgs3onagtyamztitzgqb21z9hmwnwfdqoabmew4ppk2i5-2r0upkukt2asdfsdf3234512ad 10.129.2.21:2377

To add a manager to this swarm, run 'docker swarm join-token manager' and follow the instructions. 

And we now have a swarm (with one node) up. Time to add more nodes!

root@prod-swarm-node-1:~# docker swarm join --token SWMTKN-1-42rg6zgs3onagtyamztitzgqb21z9hmwnwfdqoabmew4ppk2i5-2r0upkukt2asdfsdf3234512ad 10.129.2.21:2377
This node joined a swarm as a worker. 

root@prod-swarm-node-2:~# docker swarm join --token SWMTKN-1-42rg6zgs3onagtyamztitzgqb21z9hmwnwfdqoabmew4ppk2i5-2r0upkukt2asdfsdf3234512ad 10.129.2.21:2377
This node joined a swarm as a worker. 

root@prod-swarm-node-3:~# docker swarm join --token SWMTKN-1-42rg6zgs3onagtyamztitzgqb21z9hmwnwfdqoabmew4ppk2i5-2r0upkukt2asdfsdf3234512ad 10.129.2.21:2377
This node joined a swarm as a worker. 

root@prod-swarm-node-3:~# docker swarm join --token SWMTKN-1-42rg6zgs3onagtyamztitzgqb21z9hmwnwfdqoabmew4ppk2i5-2r0upkukt2asdfsdf3234512ad 10.129.2.21:2377
This node joined a swarm as a worker. 

We should now have our swarm up and running – run docker node list, to see!

root@prod-swarm-manager-1:~# docker node list
 ID                            HOSTNAME                 STATUS              AVAILABILITY        MANAGER STATUS      ENGINE VERSION
 p9ojg9edmipi7saldcbrcnhyt *   prod-swarm-manager-1     Ready               Active              Leader              19.03.1
 lnp2b2ijurmtamp0if4aner7y     prod-swarm-node-1        Ready               Active                                  19.03.1
 caxka5zdq0nb9lilcvss1fv82     prod-swarm-node-2        Ready               Active                                  19.03.1
 k0ar3rgjzoz1jjncfpr5xd9t1     prod-swarm-node-3        Ready               Active                                  19.03.1
 oa0ym3ytsgf5svbs2rz205jwr     prod-swarm-node-4        Ready               Active                                  19.03.1

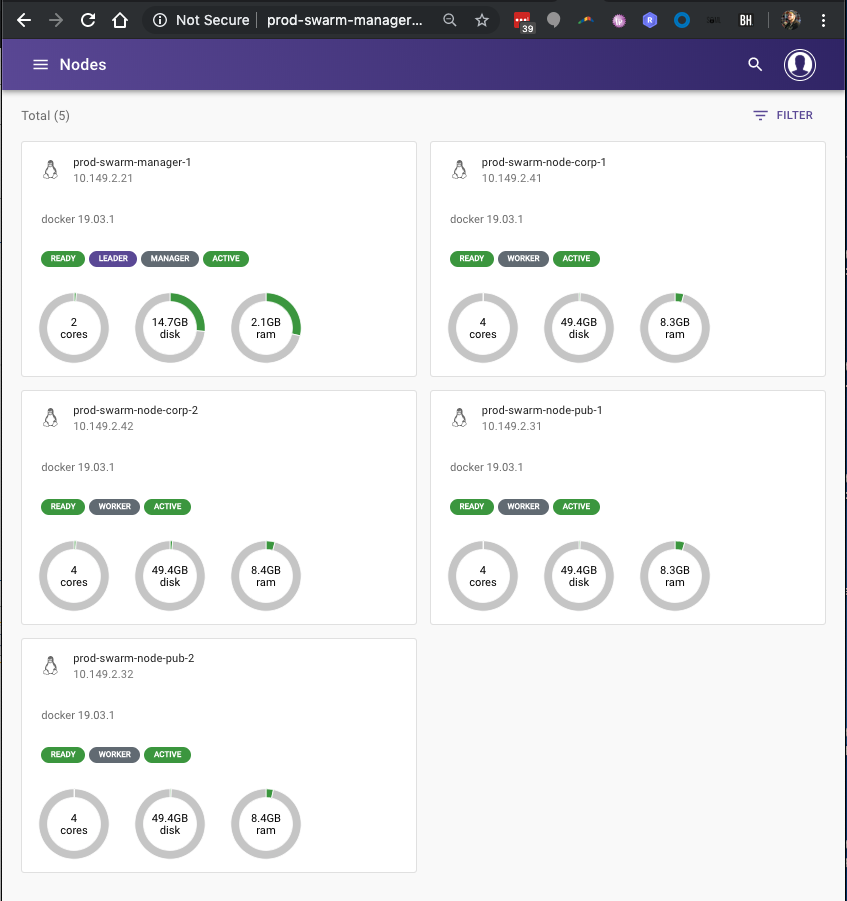
We do, perfect! We now want to manage the swarm with a nice web interface, so lets bring up swarmpit.

root@prod-swarm-manager-1:~# docker run -it --rm \
>   --name swarmpit-installer \
>   --volume /var/run/docker.sock:/var/run/docker.sock \
>   swarmpit/install:1.7
Unable to find image 'swarmpit/install:1.7' locally
1.7: Pulling from swarmpit/install
e7c96db7181b: Pull complete 
5297bd381816: Pull complete 
3a664477889c: Pull complete 
a9b893dcc701: Pull complete 
48bf7c1cb0dd: Pull complete 
555b6ea27ad2: Pull complete 
7e8a5ec7012a: Pull complete 
6adc20046ac5: Pull complete 
42a1f54aa48c: Pull complete 
717a4f34e541: Pull complete 
f95ad45cac17: Pull complete 
f963bb249c55: Pull complete 
Digest: sha256:04e47b8533e5b4f9198d4cbdfea009acac56417227ce17a9f1df549ab66a8520
Status: Downloaded newer image for swarmpit/install:1.7
                                        _ _   
 _____      ____ _ _ __ _ __ ___  _ __ (_) |_ 
/ __\ \ /\ / / _` | '__| '_ ` _ \| '_ \| | __|
\__ \\ V  V / (_| | |  | | | | | | |_) | | |_ 
|___/ \_/\_/ \__,_|_|  |_| |_| |_| .__/|_|\__|
                                 |_|          
Welcome to Swarmpit
Version: 1.7
Branch: 1.7

Preparing dependencies
latest: Pulling from byrnedo/alpine-curl
8e3ba11ec2a2: Pull complete 
6522ab4c8603: Pull complete 
Digest: sha256:e8cf497b3005c2f66c8411f814f3818ecd683dfea45267ebfb4918088a26a18c
Status: Downloaded newer image for byrnedo/alpine-curl:latest
DONE.

Preparing installation
Cloning into 'swarmpit'...
remote: Enumerating objects: 6, done.
remote: Counting objects: 100% (6/6), done.
remote: Compressing objects: 100% (6/6), done.
remote: Total 17028 (delta 1), reused 1 (delta 0), pack-reused 17022
Receiving objects: 100% (17028/17028), 4.39 MiB | 3.05 MiB/s, done.
Resolving deltas: 100% (10146/10146), done.
DONE.

Application setup
Enter stack name [swarmpit]: prod-swarmpit
Enter application port [888]: 
Enter database volume driver [local]: 
Enter admin username [admin]: 
Enter admin password (min 8 characters long): SYJpt6FQ@*j2ztPZ53^yF@!q5VRkZRyr*h$ydWGYE67$RWaHWat5Q$g6#zQtA3q^8QgQeSAMBEPT2^z8t2y#GKb5^X%e
DONE.

Application deployment
Creating network prod-swarmpit_net
Creating service prod-swarmpit_db
Creating service prod-swarmpit_agent
Creating service prod-swarmpit_app
DONE.

Starting swarmpit............DONE.
Initializing swarmpit...DONE.

Summary
Username: admin
Password: SYJpt6FQ@*j2ztPZ53^yF@!q5VRkZRyr*h$ydWGYE67$RWaHWat5Q$g6#zQtA3q^8QgQeSAMBEPT2^z8t2y#GKb5^X%e
Swarmpit is running on port :888

Enjoy :)

And bingo! If I hit up the manager host on port 888, I can login and view the swarm state!

Setting up docker on a new Ubuntu 18.04 server

This is actually fairly simple 🙂

In fact, REALLY simple 😀 Just do the following:

curl -fsSL https://download.docker.com/linux/ubuntu/gpg | sudo apt-key add -
add-apt-repository "deb [arch=amd64] https://download.docker.com/linux/ubuntu $(lsb_release -cs) stable"
apt update
apt-get install -y docker-ce
systemctl start docker
systemctl enable docker 

If you’re running CSF, you’ll want a couple of extra CSF modules installed, namely https://github.com/juliengk/csf-pre_post_sh and https://github.com/juliengk/csf-post-docker

But other than that? Yep, all done 🙂

Changing hostname on Ubuntu 18.04

So we have finally started rolling out 18.04 VM’s for corporate use at work (R1soft finally started rolling ‘non-beta’ modules, which was our main blocker), occasionally I’ll go to run up a bunch of VM’s and munge the hostname of one machine.. With cloud-init, it’s not quite a simple as editing /etc/hostname and rebooting anymore.. But it’s not too bad 🙂

First, edit /etc/cloud/cloud.cfg, and look for the preseve_hostname: field – you want this set to true.

#This will cause the set+update hostname module to not operate (if true)
preserve_hostname: true

Once done, run ‘hostnamectl’

root@prod-docker-manager-1:~# hostnamectl
   Static hostname: prod-docker-manager-1
         Icon name: computer-vm
           Chassis: vm
        Machine ID: 71431bc67882462ab8752997212223e8
           Boot ID: 2523f4f9cc3142b5bf56ad73f93da02e
    Virtualization: vmware
  Operating System: Ubuntu 18.04.2 LTS
            Kernel: Linux 4.15.0-45-generic
      Architecture: x86-64

This will show your current hostname. I guess you don’t need to really show this, it’s handy to know that it IS set as static. If it’s not, you’ll want to go google something 😉

You can now just run ‘hostnamectl set-hostname <newhostname>’

root@prod-docker-manager-1:~# hostnamectl set-hostname prod-swarm-manager-1
root@prod-docker-manager-1:~# hostnamectl
   Static hostname: prod-swarm-manager-1
         Icon name: computer-vm
           Chassis: vm
        Machine ID: 71431bc67882462ab8752997212223e8
           Boot ID: 2523f4f9cc3142b5bf56ad73f93da02e
    Virtualization: vmware
  Operating System: Ubuntu 18.04.2 LTS
            Kernel: Linux 4.15.0-45-generic
      Architecture: x86-64

And you’re good to go. Reboot if you have processes running which depend on the hostname. Or not if this is a brand new host (which is my usual case, where I’ve munged something during the VM install, and am now SSH’d in as the temporary local user to do the actual provisioning).