Exporting a Sophos UTM Configuration into Something You Can Actually Migrate From

Migrating away from Sophos UTM can be awkward. The WebAdmin interface gives you a configuration backup, but that backup is not especially friendly if your goal is to understand firewall rules, NAT, aliases, services, routing, WAF objects, or VPN leftovers.

The .abf backup is useful for disaster recovery, but it is not a migration document. It is a bundled configuration state file. You can pull strings out of it, but you will quickly end up spelunking through object references, internal IDs, and historical cruft.

A better approach is to use the Sophos UTM WebAdmin API to export the object graph into JSON, then process that into readable files.

That gives you something much more useful for migration planning:

  • Network objects
  • Host objects
  • Network groups
  • Service definitions
  • Service groups
  • Firewall rules
  • NAT rules
  • Masquerading rules
  • Static routes
  • Policy routes
  • WAF entries
  • Mail protection leftovers
  • VPN objects
  • OSPF/BGP routing objects
  • References between rules and objects

Once exported, you can review what is actually in use, identify stale rules, and start mapping Sophos concepts into your next firewall platform, whether that is OPNsense, pfSense, VyOS, FortiGate, Juniper SRX, MikroTik, Linux nftables, or something completely custom.

Why not just use the backup file?

Sophos UTM backups are great if your goal is restoring Sophos UTM.

They are much less helpful if your goal is migration.

The backup contains the whole appliance configuration, but it is not shaped like a clean firewall policy export. You may be able to extract strings and object names, but it is not pleasant to answer questions like:

  • Which firewall rules reference this host?
  • Which NAT rules still matter?
  • Which service groups include TCP and UDP members?
  • Which rules reference deleted or stale objects?
  • Which WAF entries are still tied to services we no longer run?
  • Which aliases are genuinely reused versus one-off leftovers?
  • Which objects are safe to ignore?

The WebAdmin API gives you structured JSON. That is the difference between archaeology with a toothbrush and having a map.

Enabling the Sophos UTM WebAdmin API

In WebAdmin, enable the REST API under the WebAdmin/API settings.

The exact menu name can vary slightly by UTM version, but generally you need to:

  1. Enable the WebAdmin REST API.
  2. Create or identify an administrative account that can access the API.
  3. Make sure your export host is allowed to connect to WebAdmin.
  4. Confirm HTTPS access to the UTM WebAdmin port.

Most UTM appliances use a self-signed certificate, so your client will probably need to disable TLS verification for this one-off export, or trust the appliance certificate.

API export strategy

The Sophos API is object-reference heavy. A firewall rule often does not contain the full source, destination, and service definition directly. Instead, it references objects by REF IDs.

So the export process needs two layers:

  1. Export major collections such as firewall rules, NAT rules, network objects, and service objects.
  2. Resolve references later when generating human-readable output.

For example, a firewall rule may reference:

REF_NetHosDmzGeppetto
REF_ServiceTcpHttps
REF_NetGrpInternalNetworks

Those references are not useful by themselves. You need the object export too, so you can turn them into:

DMZ-Geppetto
HTTPS
Internal Networks

Example PHP API client

Here is a small PHP client that can connect to Sophos UTM and export a set of common API endpoints to JSON files.

It is deliberately simple. It is not a full SDK. Its job is to get the configuration out of the appliance and into a directory where you can inspect, process, diff, and transform it.

<?php

declare(strict_types=1);

final class SophosUtmClient
{
    private string $baseUrl;
    private string $username;
    private string $password;
    private bool $verifyTls;

    public function __construct(
        string $baseUrl,
        string $username,
        string $password,
        bool $verifyTls = false
    ) {
        $this->baseUrl = rtrim($baseUrl, '/');
        $this->username = $username;
        $this->password = $password;
        $this->verifyTls = $verifyTls;
    }

    public function get(string $path): array
    {
        $url = $this->baseUrl . '/' . ltrim($path, '/');

        $ch = curl_init($url);

        curl_setopt_array($ch, [
            CURLOPT_RETURNTRANSFER => true,
            CURLOPT_USERPWD => $this->username . ':' . $this->password,
            CURLOPT_HTTPAUTH => CURLAUTH_BASIC,
            CURLOPT_HTTPHEADER => [
                'Accept: application/json',
            ],
            CURLOPT_SSL_VERIFYPEER => $this->verifyTls,
            CURLOPT_SSL_VERIFYHOST => $this->verifyTls ? 2 : 0,
            CURLOPT_CONNECTTIMEOUT => 10,
            CURLOPT_TIMEOUT => 60,
        ]);

        $body = curl_exec($ch);

        if ($body === false) {
            $error = curl_error($ch);
            curl_close($ch);
            throw new RuntimeException("cURL error calling {$url}: {$error}");
        }

        $status = curl_getinfo($ch, CURLINFO_HTTP_CODE);
        curl_close($ch);

        if ($status < 200 || $status >= 300) {
            throw new RuntimeException("HTTP {$status} from {$url}: {$body}");
        }

        $decoded = json_decode($body, true);

        if (!is_array($decoded)) {
            throw new RuntimeException("Invalid JSON from {$url}: {$body}");
        }

        return $decoded;
    }
}

Export script

This script loops over a set of useful Sophos UTM endpoints and writes the responses to JSON files.

<?php

declare(strict_types=1);

require __DIR__ . '/SophosUtmClient.php';

$baseUrl = getenv('SOPHOS_URL') ?: '';
$username = getenv('SOPHOS_USERNAME') ?: '';
$password = getenv('SOPHOS_PASSWORD') ?: '';
$outputDir = getenv('SOPHOS_EXPORT_DIR') ?: __DIR__ . '/sophos-export';

if ($baseUrl === '' || $username === '' || $password === '') {
    fwrite(STDERR, "Required environment variables:\n");
    fwrite(STDERR, "  SOPHOS_URL=https://utm.example.com:4444/api\n");
    fwrite(STDERR, "  SOPHOS_USERNAME=admin\n");
    fwrite(STDERR, "  SOPHOS_PASSWORD=secret\n");
    fwrite(STDERR, "Optional:\n");
    fwrite(STDERR, "  SOPHOS_EXPORT_DIR=./sophos-export\n");
    exit(1);
}

$client = new SophosUtmClient(
    baseUrl: $baseUrl,
    username: $username,
    password: $password,
    verifyTls: false
);

$endpoints = [
    // Network objects
    '/objects/network/host',
    '/objects/network/network',
    '/objects/network/group',
    '/objects/network/interface_address',
    '/objects/network/dns_host',
    '/objects/network/dns_group',
    '/objects/network/availability_group',

    // Services
    '/objects/service/tcp',
    '/objects/service/udp',
    '/objects/service/tcpudp',
    '/objects/service/icmp',
    '/objects/service/group',

    // Firewall
    '/objects/packetfilter/packetfilter',
    '/objects/packetfilter/group',

    // NAT
    '/objects/nat/masquerading',
    '/objects/nat/dnat',
    '/objects/nat/snat',
    '/objects/nat/fullnat',

    // Routing
    '/objects/routing/static_gateway_route',
    '/objects/routing/static_interface_route',
    '/objects/routing/policy_route',

    // Interfaces
    '/objects/interface/ethernet',
    '/objects/interface/vlan',
    '/objects/interface/bridge',
    '/objects/interface/pppoe',

    // Web protection / WAF
    '/objects/reverse_proxy/frontend',
    '/objects/reverse_proxy/backend',
    '/objects/reverse_proxy/profile',

    // Mail protection
    '/objects/mail/smtp/profile',
    '/objects/mail/smtp/route',
    '/objects/mail/pop3/profile',

    // VPN-ish objects
    '/objects/ipsec/connection',
    '/objects/ipsec/remote_gateway',
    '/objects/openvpn/site_to_site',
    '/objects/openvpn/remote_access',

    // Routing daemons, if used
    '/objects/ospf/area',
    '/objects/ospf/interface',
    '/objects/bgp/system',
    '/objects/bgp/neighbor',
];

if (!is_dir($outputDir) && !mkdir($outputDir, 0775, true)) {
    throw new RuntimeException("Could not create output directory: {$outputDir}");
}

foreach ($endpoints as $endpoint) {
    $safeName = trim($endpoint, '/');
    $safeName = str_replace('/', '__', $safeName);
    $file = $outputDir . '/' . $safeName . '.json';

    echo "Exporting {$endpoint} -> {$file}\n";

    try {
        $data = $client->get($endpoint);

        file_put_contents(
            $file,
            json_encode($data, JSON_PRETTY_PRINT | JSON_UNESCAPED_SLASHES)
        );
    } catch (Throwable $e) {
        $errorFile = $outputDir . '/' . $safeName . '.error.txt';

        file_put_contents($errorFile, $e->getMessage() . PHP_EOL);

        echo "  ERROR: {$e->getMessage()}\n";
    }
}

Run it like this:

export SOPHOS_URL='https://utm.example.com:4444/api'
export SOPHOS_USERNAME='admin'
export SOPHOS_PASSWORD='your-password'
export SOPHOS_EXPORT_DIR='./sophos-export'

php export-sophos.php

After the export, you should have a directory full of files like:

objects__network__host.json
objects__network__network.json
objects__network__group.json
objects__service__tcp.json
objects__service__udp.json
objects__packetfilter__packetfilter.json
objects__nat__dnat.json
objects__nat__masquerading.json

Turning the export into a readable inventory

Raw JSON is better than a backup file, but it is still not migration-ready. The next step is to build lookup tables.

The basic idea is:

  1. Read every exported JSON file.
  2. Index every object by its Sophos REF.
  3. Use that index to resolve firewall rules, NAT rules, and groups.
  4. Emit readable CSV, Markdown, YAML, or JSON.

Here is a simplified object indexer:

<?php

declare(strict_types=1);

function loadJsonFiles(string $dir): array
{
    $objects = [];

    foreach (glob($dir . '/*.json') as $file) {
        $data = json_decode((string) file_get_contents($file), true);

        if (!is_array($data)) {
            continue;
        }

        foreach (normaliseSophosCollection($data) as $item) {
            if (!is_array($item)) {
                continue;
            }

            $ref = $item['_ref'] ?? $item['ref'] ?? null;

            if (is_string($ref) && $ref !== '') {
                $objects[$ref] = $item + [
                    '_source_file' => basename($file),
                ];
            }
        }
    }

    return $objects;
}

function normaliseSophosCollection(array $data): array
{
    if (array_is_list($data)) {
        return $data;
    }

    foreach (['objects', 'items', 'result', 'data'] as $key) {
        if (isset($data[$key]) && is_array($data[$key])) {
            return array_is_list($data[$key]) ? $data[$key] : array_values($data[$key]);
        }
    }

    return array_values($data);
}

function objectName(?string $ref, array $index): string
{
    if ($ref === null || $ref === '') {
        return '';
    }

    if (!isset($index[$ref])) {
        return $ref;
    }

    return $index[$ref]['name'] ?? $index[$ref]['_ref'] ?? $ref;
}

Then you can use it to make a readable firewall rule export.

<?php

declare(strict_types=1);

require __DIR__ . '/sophos-index.php';

$exportDir = $argv[1] ?? './sophos-export';

$index = loadJsonFiles($exportDir);

$rulesFile = $exportDir . '/objects__packetfilter__packetfilter.json';

if (!is_file($rulesFile)) {
    throw new RuntimeException("Missing firewall rules export: {$rulesFile}");
}

$rulesRaw = json_decode((string) file_get_contents($rulesFile), true);
$rules = normaliseSophosCollection($rulesRaw);

$out = fopen('php://output', 'w');

fputcsv($out, [
    'enabled',
    'position',
    'name',
    'source',
    'service',
    'destination',
    'action',
    'comment',
]);

foreach ($rules as $rule) {
    if (!is_array($rule)) {
        continue;
    }

    $sources = array_map(
        fn($ref) => objectName($ref, $index),
        (array)($rule['sources'] ?? $rule['source'] ?? [])
    );

    $services = array_map(
        fn($ref) => objectName($ref, $index),
        (array)($rule['services'] ?? $rule['service'] ?? [])
    );

    $destinations = array_map(
        fn($ref) => objectName($ref, $index),
        (array)($rule['destinations'] ?? $rule['destination'] ?? [])
    );

    fputcsv($out, [
        empty($rule['disabled']) ? 'yes' : 'no',
        $rule['position'] ?? '',
        $rule['name'] ?? '',
        implode(', ', $sources),
        implode(', ', $services),
        implode(', ', $destinations),
        $rule['action'] ?? '',
        $rule['comment'] ?? $rule['description'] ?? '',
    ]);
}

Run it:

php readable-firewall-rules.php ./sophos-export > firewall-rules.csv

Now you have something that humans can work with.

Important migration gotchas

Sophos groups do not always map cleanly

Sophos may allow a rule to refer to several objects directly. Your new platform may require a single alias, address group, or port group.

During one migration, I ran into this exact issue with OPNsense automation rules. A Sophos rule could effectively say:

source: Internal Networks, DNS Server 1, DNS Server 2
destination: Pi-hole
service: DNS

But the target firewall API wanted:

source: one alias
destination: one alias
service: one alias

So the migration process needed to create a new group alias such as:

DNS_ALLOWED_SOURCES:
  type: networkgroup
  content:
    - INT_INTERNAL_ADDRESSES
    - DNS_SERVER_1
    - DNS_SERVER_2

Then the rule could reference DNS_ALLOWED_SOURCES.

Service groups may need flattening

Sophos service groups can contain multiple service definitions, and those definitions may be TCP, UDP, or mixed.

For example:

AMP_GROUP1:
  protocol: tcp
  ports:
    - 2121:2281

AMP_GROUP10:
  protocol: tcpudp
  ports:
    - 30810:30900

For a target firewall, it may be cleaner to create one combined port alias:

AMP_PORTS:
  type: port
  content:
    - 2121:2281
    - 30810:30900

Then set the firewall rule protocol to tcp/udp.

Object names may be too long

Sophos object names can be verbose. Some target platforms have stricter alias length limits.

For example, a name like this may need shortening:

SOPHOS_OBJ_SYDNEY_VLAN102_MANAGEMENT

into something like:

so_sydney_vlan102_mgmt

If you do this, keep a mapping file:

SOPHOS_OBJ_SYDNEY_VLAN102_MANAGEMENT: so_sydney_vlan102_mgmt

That mapping file becomes extremely useful when troubleshooting after cutover.

“Any” cannot always be combined with other aliases

If a Sophos rule has something like:

source: Any, SomeSpecificAlias

the target platform may reject it.

Logically, Any + Something is just Any, so simplify it.

Special Sophos objects need manual mapping

Sophos has concepts like:

This Firewall
External WAN Address
Interface Address
SYNC net

Those may not export as normal aliases that your new firewall understands.

You may need to map them manually:

FW_ROUTING_VIP:
  type: host
  content:
    - 192.168.10.49

FW_DMZ_VIP:
  type: host
  content:
    - 103.235.52.81

Do not assume the target firewall will understand the literal string This Firewall.

Recommended output formats

For migration, I like producing several layers of output.

1. Raw JSON

Keep the original API exports untouched.

sophos-export/raw/*.json

This is your evidence locker.

2. Resolved JSON

Create a version where references are expanded.

{
  "name": "Allow DNS to Pi-hole",
  "source": [
    {
      "ref": "REF_NetGrpInternal",
      "name": "Internal Networks"
    }
  ],
  "service": [
    {
      "ref": "REF_SerDns",
      "name": "DNS",
      "protocols": ["tcp", "udp"],
      "ports": ["53"]
    }
  ],
  "destination": [
    {
      "ref": "REF_NetHostPiHole",
      "name": "DMZ Pi-hole"
    }
  ]
}

3. CSV for review

This is useful for non-automation review.

enabled, position, name, source, service, destination, action, comment

4. YAML for migration

This becomes the start of your Git-managed target firewall configuration.

allow-dns-to-pihole:
  enabled: true
  source_net: DNS_ALLOWED_SOURCES
  destination_net: DMZ_PI_HOLE
  destination_port: DNS
  protocol: tcp/udp
  action: pass

Suggested migration workflow

A practical migration workflow looks like this:

  1. Export the UTM API into raw JSON.
  2. Build an object reference index.
  3. Generate readable firewall/NAT/routing reports.
  4. Identify dead services, old VPNs, old mail protection, and stale WAF rules.
  5. Create target-platform aliases.
  6. Create target-platform service aliases.
  7. Convert high-value firewall rules first.
  8. Leave questionable imported rules disabled or marked for review.
  9. Manually validate NAT, routing, and special firewall-local rules.
  10. Test cutover using logs, packet captures, and known traffic flows.

Do not aim for a perfect one-to-one clone.

A firewall migration is a chance to delete years of sediment. Treat the Sophos export as a historical document, not a sacred scroll.

Lessons learned

The biggest lesson is that exporting the config is only step one.

The hard part is translating firewall semantics.

Sophos might allow constructs that your target platform rejects. Your target platform may have different ideas about aliases, port groups, NAT, interface matching, or firewall-local addresses.

In my case, the useful path was:

Sophos UTM API
  -> raw JSON export
  -> resolved object graph
  -> reviewable YAML
  -> target firewall rules
  -> manual cleanup and validation

The raw export gave me confidence. The readable YAML gave me control. The manual review kept me from blindly migrating old junk.

And that is the real goal: not just to move the firewall config, but to understand it well enough that the new firewall starts life cleaner than the old one ended.

Provisioning a Galera Cluster on Ubuntu 18.04

So, we want to bring up a Galera cluster, and do some basic testing of how to bring it back online should things go pear shaped

First, install MariaDB on all three nodes

# apt-get install software-properties-common
# apt-key adv --recv-keys --keyserver hkp://keyserver.ubuntu.com:80 0xF1656F24C74CD1D8
# add-apt-repository "deb [arch=amd64,arm64,ppc64el] http://mariadb.mirror.liquidtelecom.com/repo/10.4/ubuntu $(lsb_release -cs) main"
# apt update
# apt -y install mariadb-server mariadb-client

At this point mariadb is installed, but has no root password configured.

# mysql_secure_installation
 NOTE: RUNNING ALL PARTS OF THIS SCRIPT IS RECOMMENDED FOR ALL MariaDB
       SERVERS IN PRODUCTION USE!  PLEASE READ EACH STEP CAREFULLY!
 In order to log into MariaDB to secure it, we'll need the current
 password for the root user. If you've just installed MariaDB, and
 haven't set the root password yet, you should just press enter here.
 Enter current password for root (enter for none): 
 OK, successfully used password, moving on…
 Setting the root password or using the unix_socket ensures that nobody
 can log into the MariaDB root user without the proper authorisation.
 You already have your root account protected, so you can safely answer 'n'.
 Switch to unix_socket authentication [Y/n] 
 Enabled successfully!
 Reloading privilege tables..
  … Success!
 You already have your root account protected, so you can safely answer 'n'.
 Change the root password? [Y/n] y
 New password: 
 Re-enter new password: 
 Password updated successfully!
 Reloading privilege tables..
  … Success!
 By default, a MariaDB installation has an anonymous user, allowing anyone
 to log into MariaDB without having to have a user account created for
 them.  This is intended only for testing, and to make the installation
 go a bit smoother.  You should remove them before moving into a
 production environment.
 Remove anonymous users? [Y/n] y
  … Success!
 Normally, root should only be allowed to connect from 'localhost'.  This
 ensures that someone cannot guess at the root password from the network.
 Disallow root login remotely? [Y/n] y
  … Success!
 By default, MariaDB comes with a database named 'test' that anyone can
 access.  This is also intended only for testing, and should be removed
 before moving into a production environment.
 Remove test database and access to it? [Y/n] y
 Dropping test database…
 … Success!
 Removing privileges on test database…
 … Success! 
 Reloading the privilege tables will ensure that all changes made so far
 will take effect immediately.
 Reload privilege tables now? [Y/n] y
  … Success!
 Cleaning up…
 All done!  If you've completed all of the above steps, your MariaDB
 installation should now be secure.
 Thanks for using MariaDB!

Do this on both servers, and you’re now ready to configure the Galera Cluster portion! On each node, you want to create a /etc/mysql/mariadb.conf.d/galera.cnf file:

# cat /etc/mysql/mariadb.conf.d/galera.cnf
[mysqld]
character-set-server = utf8
character_set_server = utf8
bind-address=0.0.0.0
port=3306
default_storage_engine=InnoDB
binlog_format=row
innodb_autoinc_lock_mode=2
# Galera cluster configuration
wsrep_on=ON
wsrep_provider=/usr/lib/galera/libgalera_smm.so
wsrep_cluster_address="gcomm://192.168.1.201,192.168.1.202,192.168.1.203"
wsrep_cluster_name="galera-cluster-1"
wsrep_sst_method=rsync
# Cluster node configuration
wsrep_node_address="192.168.1.201"
wsrep_node_name="galera-host-01"

#

The only difference between this file on each node is the last two lines – wsrep_node_address, and wsrep_node_name. note: You’ll probably want to have hosts file entries on your nodes to map IP’s to names and vice versa, unless you have reliable DNS configured internally, as it affects your cluster status displays.
Your wsrep_cluster_address line will have the IP’s of your cluster nodes.

Stop MariaDB on all nodes, and boot galera on the first node:

node2# systemctl stop mariadb
node3# systemctl stop mariadb
node1# systemctl stop mariadb
node1# galera_new_cluster

Your cluster should now have started. Lets check the cluster state.

root@galera-host-01:~# mysql -e "show status like 'wsrep_%'"
 
+-------------------------------+------------------------------------------------
| Variable_name                 | Value                               +-------------------------------+------------------------------------------------
 | wsrep_local_state_uuid        | fd6dbdcc-c95e-11e9-ac52-570534ceb766           
 | wsrep_protocol_version        | 10  
 | wsrep_last_committed          | 1 
 | wsrep_replicated              | 0 
 | wsrep_replicated_bytes        | 0 
 | wsrep_repl_keys               | 0 
 | wsrep_repl_keys_bytes         | 0 
 | wsrep_repl_data_bytes         | 0 
 | wsrep_repl_other_bytes        | 0 
 | wsrep_received                | 2 
 | wsrep_received_bytes          | 144 
 | wsrep_local_commits           | 0  
 | wsrep_local_cert_failures     | 0  
 | wsrep_local_replays           | 0 
 | wsrep_local_send_queue        | 0 
 | wsrep_local_send_queue_max    | 1 
 | wsrep_local_send_queue_min    | 0 
 | wsrep_local_send_queue_avg    | 0 
 | wsrep_local_recv_queue        | 0 
 | wsrep_local_recv_queue_max    | 1 
 | wsrep_local_recv_queue_min    | 0 
 | wsrep_local_recv_queue_avg    | 0  
 | wsrep_local_cached_downto     | 1 
 | wsrep_flow_control_paused_ns  | 0 
 | wsrep_flow_control_paused     | 0 
 | wsrep_flow_control_sent       | 0 
 | wsrep_flow_control_recv       | 0 
 | wsrep_cert_deps_distance      | 0 
 | wsrep_apply_oooe              | 0 
 | wsrep_apply_oool              | 0 
 | wsrep_apply_window            | 0 
 | wsrep_commit_oooe             | 0 
 | wsrep_commit_oool             | 0 
 | wsrep_commit_window           | 0 
 | wsrep_local_state             | 4 
 | wsrep_local_state_comment     | Synced 
 | wsrep_cert_index_size         | 0 
 | wsrep_causal_reads            | 0 
 | wsrep_cert_interval           | 0 
 | wsrep_open_transactions       | 0 
 | wsrep_open_connections        | 0 
 | wsrep_incoming_addresses      | AUTO 
 | wsrep_cluster_weight          | 1 
 | wsrep_desync_count            | 0 
 | wsrep_evs_delayed             |  
 | wsrep_evs_evict_list          |  
 | wsrep_evs_repl_latency        | 0/0/0/0/0 
 | wsrep_evs_state               | OPERATIONAL 
 | wsrep_gcomm_uuid              | fd6cf1bd-c95e-11e9-98ab-d2e5733d21d0           
 | wsrep_applier_thread_count    | 1 
 | wsrep_cluster_capabilities    |  
 | wsrep_cluster_conf_id         | 18446744073709551615 
 | wsrep_cluster_size            | 1
 | wsrep_cluster_state_uuid      | fd6dbdcc-c95e-11e9-ac52-570534ceb766           
 | wsrep_cluster_status          | Primary  
 | wsrep_connected               | ON  
 | wsrep_local_bf_aborts         | 0  
 | wsrep_local_index             | 0  
 | wsrep_provider_capabilities   | :MULTI_MASTER:CERTIFICATION:PARALLEL_APPLYING:T
 | wsrep_provider_name           | Galera 
 | wsrep_provider_vendor         | Codership Oy <info@codership.com>
 | wsrep_provider_version        | 26.4.2(r4498) 
 | wsrep_ready                   | ON   
 | wsrep_rollbacker_thread_count | 2 
 | wsrep_thread_count            | 3 
 +-------------------------------+------------------------------------------------ 

Check the cluster size to make sure the cluster came up – it should be a cluster of one right now

root@galera-host-01:~# mysql -e "show status like 'wsrep_cluster_size'"
Enter password: 
+--------------------+-------+
| Variable_name      | Value |
+--------------------+-------+
| wsrep_cluster_size | 1     |
+--------------------+-------+

This looks good – time to boot the second server

galera-host-02# systemctl start mariadb

Check the cluster size again – it should now be 2

root@galera-host-01:~# mysql -u root -p -e "show status like 'wsrep_cluster_size'"
Enter password: 
+--------------------+-------+
| Variable_name      | Value |
+--------------------+-------+
| wsrep_cluster_size | 2     |
+--------------------+-------+

Start node3, and you’ll see the node size at 3. Nice.

Cluster monitoring for HAProxy

Having a cluster is no good if you don’t have your client machines load balancing across them, and only talking to ‘up’ servers.

For this you need a way for HAProxy to know the state of each server. I like the ‘clustercheck’ script from obissick. (https://github.com/obissick/Galera-ClusterCheck)

First we add a cluster check user to MySQL.

create user clustercheckuser@'localhost' IDENTIFIED BY 'h3fUU3373Pb17Vjt&^C39hFHelA';
GRANT PROCESS ON *.* TO 'clustercheckuser'@'localhost';

Then Install the clustercheck script, and edit it

curl https://raw.githubusercontent.com/obissick/Galera-ClusterCheck/master/clustercheck.sh > /usr/bin/clustercheck
chmod +x /usr/bin/clustercheck
vi /usr/bin/clustercheck
edit the MYSQL_PASSWORD line to put the password in..
i.e. MYSQL_PASSWORD="${2-h3fUU3373Pb17Vjt&^C39hFHelA}"
apt-get install -y xinetd
echo "mysqlchk 9200/tcp #mysql check script" >> /etc/services
cat > /etc/xinetd.d/mysqlchk << __END__
default: on
description: mysqlchk
service mysqlchk
{
disable = no
flags = REUSE
socket_type = stream
port = 9200
wait = no
user = nobody
server = /usr/bin/clustercheck
log_on_failure += USERID
only_from = 192.168.1.0/24
per_source = UNLIMITED
}
__END__
service xinetd restart

Note: you will want to change the only_from to match any IP’s which will be running haproxy. Deploy the above to all members of your galera cluster.

Now, on each client machine, we can configure a block in haproxy similar to the below:

frontend mysql-dev-front
bind 127.0.0.1:3307
mode tcp
default_backend mysql-dev-back

backend mysql-dev-back
mode tcp
balance leastconn
option tcpka
option httpchk
default-server port 9200 inter 2s downinter 5s rise 3 fall 2 slowstart 60s weight 100
server node1 192.168.1.201:3306 check
server node2 192.168.1.202:3306 check
server node3 192.168.1.203:3306 check

NOTE: Make sure that you can connect to port 9200 on both MySQL servers from your client server BEFORE enabling this config in HAProxy!

curl http://192.168.1.201:9200
Galera Cluster Node is synced.
curl: (56) Recv failure: Connection reset by peer

once this is complete, any applications on your client machine can connect to localhost:3307

Failure Modes

Ok so this is one of the most important things we need to think about. There are a few failure modes we need to be able to handle in the cluster.

One node is shut down

Lets insert some rows into a test database, and then shut down node 2.

root@galera-host-01:~# mysql
Welcome to the MariaDB monitor.  Commands end with ; or \g.
Your MariaDB connection id is 50
Server version: 10.4.7-MariaDB-1:10.4.7+maria~bionic-log mariadb.org binary distribution
Copyright (c) 2000, 2018, Oracle, MariaDB Corporation Ab and others.
Type 'help;' or '\h' for help. Type '\c' to clear the current input statement.

MariaDB [(none)]> create database ninjas;
Query OK, 1 row affected (0.006 sec)
MariaDB [(none)]> use ninjas;
Database changed
MariaDB [ninjas]> create table table1 (row1 integer not null);
Query OK, 0 rows affected (0.013 sec)
MariaDB [ninjas]> insert into table1 values (1), (2), (3), (4), (5), (6);
Query OK, 6 rows affected (0.006 sec)
Records: 6  Duplicates: 0  Warnings: 0

root@galera-host-02:~# mysql ninjas -e "select * from table1;"
 +------+
 | row1 |
 +------+
 |    1 |
 |    2 |
 |    3 |
 |    4 |
 |    5 |
 |    6 |
 +------+
root@galera-host-02:~# systemctl stop mariadb

root@galera-host-01:~# mysql ninjas -e "insert into table1 values (7), (8), (9);"

Ok, so we now have data in the DB since host-02 was shutdown. We’re now going to bring host-02 back up and check that it comes back into the cluster cleanly

root@galera-host-02:~# systemctl start mariadb
root@galera-host-02:~# mysql ninjas -e "select * from table1;"
+------+
| row1 |
+------+
| 1 |
| 2 |
| 3 |
| 4 |
| 5 |
| 6 |
| 7 |
| 8 |
| 9 |
+------+

Perfect.

All the nodes are shut down

And re-started in the correct order

How about where we have to shut down the cluster, and bring it back online? Lets shut down the nodes, first we’ll do reverse order 03, 02, 01, then bring them up 01, 02, 03. (Yes, That’s the way you’re meant to do it. We’re going to do it wrong soon, and see how to recover from that..)

root@galera-host-03:~# systemctl stop mariadb
root@galera-host-02:~# systemctl stop mariadb
root@galera-host-01:~# systemctl stop mariadb

If we have a look in /var/lib/mysql/grastate.dat on each host, we’ll see that galera-host-01 is indeed the host we should be booting the cluster from:

root@galera-host-01:~# cat /var/lib/mysql/grastate.dat 
GALERA saved state
version: 2.1
uuid:    a10015aa-cd62-11e9-a80b-87dacc3a89c3
seqno:   11
safe_to_bootstrap: 1

root@galera-host-02:~# cat /var/lib/mysql/grastate.dat 
GALERA saved state
version: 2.1
uuid:    a10015aa-cd62-11e9-a80b-87dacc3a89c3
seqno:   10
safe_to_bootstrap: 0

root@galera-host-03:~# cat /var/lib/mysql/grastate.dat 
GALERA saved state
version: 2.1
uuid:    a10015aa-cd62-11e9-a80b-87dacc3a89c3
seqno:   9
safe_to_bootstrap: 0

Ok, so we should simply be able to boot the cluster by running galera_new_cluster on galera-host-01, and then starting the other hosts

root@galera-host-01:~# galera_new_cluster
root@galera-host-01:~# mysql -e "show status like 'wsrep_cluster_size'"
+--------------------+-------+
| Variable_name      | Value |
+--------------------+-------+
| wsrep_cluster_size | 1     |
+--------------------+-------+

root@galera-host-02:~# systemctl start mariadb

root@galera-host-01:~# mysql -e "show status like 'wsrep_cluster_size'"
+--------------------+-------+
| Variable_name      | Value |
+--------------------+-------+
| wsrep_cluster_size | 2     |
+--------------------+-------+

root@galera-host-03:~# systemctl start mariadb

root@galera-host-01:~# mysql -e "show status like 'wsrep_cluster_size'"
+--------------------+-------+
| Variable_name      | Value |
+--------------------+-------+
| wsrep_cluster_size | 3     |
+--------------------+-------+

Restarting the cluster in the wrong order

Ok now lets shut it down with host 01 first, and then boot it from host01 first. So, we’re going to shut down the nodes, and then check our galera replication state files

root@galera-host-01:~# systemctl stop mariadb
root@galera-host-02:~# systemctl stop mariadb
root@galera-host-03:~# systemctl stop mariadb

root@galera-host-01:~# cat /var/lib/mysql/grastate.dat 
GALERA saved state
version: 2.1
uuid:    a10015aa-cd62-11e9-a80b-87dacc3a89c3
seqno:   15
safe_to_bootstrap: 0

root@galera-host-02:~# cat /var/lib/mysql/grastate.dat 
GALERA saved state
version: 2.1
uuid:    a10015aa-cd62-11e9-a80b-87dacc3a89c3
seqno:   16
safe_to_bootstrap: 0

root@galera-host-03:~# cat /var/lib/mysql/grastate.dat 
GALERA saved state
version: 2.1
uuid:    a10015aa-cd62-11e9-a80b-87dacc3a89c3
seqno:   17
safe_to_bootstrap: 1

Yep, so host-03 would be the correct host to start. But we’re going to start host-01.

root@galera-host-01:~# galera_new_cluster 
 Job for mariadb.service failed because the control process exited with error code.
 See "systemctl status mariadb.service" and "journalctl -xe" for details.

Well, that’s promising. It won’t let us do it. If we check the log, we se:

2019-09-02  9:58:05 0 [Note] WSREP: Start replication
2019-09-02  9:58:05 0 [Note] WSREP: Connecting with bootstrap option: 1
2019-09-02  9:58:05 0 [Note] WSREP: Setting GCS initial position to a10015aa-cd62-11e9-a80b-87dacc3a89c3:15
2019-09-02  9:58:05 0 [ERROR] WSREP: It may not be safe to bootstrap the cluster from this node. It was not the last one to leave the cluster and may not contain all the updates. To force cluster bootstrap with this node, edit the grastate.dat file manually and set safe_to_bootstrap to 1 .
2019-09-02  9:58:05 0 [ERROR] WSREP: wsrep::connect(gcomm://192.168.13.201,192.168.13.202,192.168.13.203) failed: 7
2019-09-02  9:58:05 0 [ERROR] Aborting

Ok. lets make it really bad, lets edit grastate.dat and set safe_to_bootstrap to 1 😀

root@galera-host-01:~# galera_new_cluster 
root@galera-host-01:~# mysql -e "show status like 'wsrep_cluster_size'"
 +--------------------+-------+
 | Variable_name      | Value |
 +--------------------+-------+
 | wsrep_cluster_size | 1     |
 +--------------------+-------+

Ok, promising. Lets start host-02

root@galera-host-02:~# systemctl start mariadb
root@galera-host-01:~# mysql -e "show status like 'wsrep_cluster_size'"
+--------------------+-------+
| Variable_name      | Value |
+--------------------+-------+
| wsrep_cluster_size | 2     |
+--------------------+-------+

Well, that’s beautiful! Ok, lets see what happens when we start host-03, which is still in safe_to_bootstrap in its’ grastate file

root@galera-host-03:~# systemctl start mariadb
root@galera-host-01:~# mysql -e "show status like 'wsrep_cluster_size'"
+--------------------+-------+
| Variable_name      | Value |
+--------------------+-------+
| wsrep_cluster_size | 3     |
+--------------------+-------+

Well, colour me impressed! Are they REALLY in sync?

root@galera-host-01:~# mysql ninjas -e "insert into table1 values (14), (15), (16);"

root@galera-host-02:~# mysql ninjas -e "select * from table1;"
+------+
| row1 |
+------+
|    1 |
|    2 |
|    3 |
|    4 |
|    5 |
|    6 |
|    7 |
|    8 |
|    9 |
|   10 |
|   11 
|   12 |
|   14 |
|   15 |
|   16 |
+------+

root@galera-host-03:~# mysql ninjas -e "select * from table1;"
+------+
| row1 |
+------+
|    1 |
|    2 |
|    3 |
|    4 |
|    5 |
|    6 |
|    7 |
|    8 |
|    9 |
|   10 |
|   11 
|   12 |
|   14 |
|   15 |
|   16 |
+------+

Well bugger me, that looks good!

Rebuilding a failed node

SHOULD you happen to have a node get completely buggered (say you have enough data that the systemd 90 second startup timeout screws you during SST and leaves your node broken), you can need to do a clean setup of MariaDB to get Galera going again.

galera-host-02# apt-get purge mariadb-server-10.4
 Reading package lists… Done
 Building dependency tree       
 Reading state information… Done
 The following packages were automatically installed and are no longer required:
   galera-4 libaio1 libcgi-fast-perl libcgi-pm-perl libfcgi-perl libhtml-template-perl mariadb-server-core-10.4 socat
 Use 'apt autoremove' to remove them.
 The following packages will be REMOVED:
   mariadb-server* mariadb-server-10.4*
 0 upgraded, 0 newly installed, 2 to remove and 0 not upgraded.
 After this operation, 77.7 MB disk space will be freed.
 Do you want to continue? [Y/n] y
 (Reading database … 68199 files and directories currently installed.)
 Removing mariadb-server (1:10.4.7+maria~bionic) …
 Removing mariadb-server-10.4 (1:10.4.7+maria~bionic) …
 Processing triggers for man-db (2.8.3-2ubuntu0.1) …
 (Reading database … 68069 files and directories currently installed.)
 Purging configuration files for mariadb-server-10.4 (1:10.4.7+maria~bionic) …

galera-host-02:~# rm -rf /var/lib/mysql/*
galera-host-02:~# mv /etc/mysql/mariadb.conf.d/galera.cnf /root/galera.cnf

galera-host-02:~# apt -y install mariadb-server mariadb-client
 Reading package lists… Done
 Building dependency tree       
 Reading state information… Done
 mariadb-client is already the newest version (1:10.4.7+maria~bionic).
 Suggested packages:
   mailx mariadb-test tinyca
 The following NEW packages will be installed:
   mariadb-server mariadb-server-10.4
 0 upgraded, 2 newly installed, 0 to remove and 0 not upgraded.
 Need to get 4,627 kB of archives.
 After this operation, 77.7 MB of additional disk space will be used.
 Get:1 http://mariadb.mirror.liquidtelecom.com/repo/10.4/ubuntu bionic/main amd64 mariadb-server-10.4 amd64 1:10.4.7+maria~bionic [4,624 kB]
 Get:2 http://mariadb.mirror.liquidtelecom.com/repo/10.4/ubuntu bionic/main amd64 mariadb-server all 1:10.4.7+maria~bionic [3,180 B]
 Fetched 4,627 kB in 6s (824 kB/s)          
 Preconfiguring packages …
 Selecting previously unselected package mariadb-server-10.4.
 (Reading database … 68059 files and directories currently installed.)
 Preparing to unpack …/mariadb-server-10.4_1%3a10.4.7+maria~bionic_amd64.deb …
 Unpacking mariadb-server-10.4 (1:10.4.7+maria~bionic) …
 Selecting previously unselected package mariadb-server.
 Preparing to unpack …/mariadb-server_1%3a10.4.7+maria~bionic_all.deb …
 Unpacking mariadb-server (1:10.4.7+maria~bionic) …
 Setting up mariadb-server-10.4 (1:10.4.7+maria~bionic) …
 Failed to stop mysql.service: Unit mysql.service not loaded.
 Created symlink /etc/systemd/system/mysql.service → /lib/systemd/system/mariadb.service.
 Created symlink /etc/systemd/system/mysqld.service → /lib/systemd/system/mariadb.service.
 Created symlink /etc/systemd/system/multi-user.target.wants/mariadb.service → /lib/systemd/system/mariadb.service.
 Setting up mariadb-server (1:10.4.7+maria~bionic) …
 Processing triggers for man-db (2.8.3-2ubuntu0.1) …

galera-host-02:~# mysql_secure_installation
......
<snipped>

galera-host-02:~# systemctl stop mariadb
galera-host-02:~# cp /root/galera.cnf /etc/mysql/mariadb.conf.d/
galera-host-02:~# echo 'TimeoutSec=infinity' >> /etc/systemd/system/mysqld.service
galera-host-02:~# systemctl daemon-reload
galera-host-02:~# systemctl start mariadb

And bingo, we’re back in the cluster 🙂

Setting up Docker Swarm in VMware NSX

Setting up Docker Swarm is pretty simple. BUT VMWare NSX is a little annoying, in that it blocks the VXLAN transport port (TCP Port 4789) at the hypervisor level. I’m sure this seemed GREAT for security, but it majorly messes up any application USING VXLAN inside the transport zone. Suck as Docker Swarm inside a cloud provider who uses VMWare NSX. As long as you know about this, you can work around it, however, as you can specify an alternate VXLAN port when you initialize your swarm! So let’s do that!

We will be bringing up a swarm on a cluster today with one manager and four nodes – each host has two network interfaces – we’ll be using ens160 in 10.129.2.0/24 for our transport network. we use the –data-path-port parameter to set the VXLAN port.

Note: Our manager, and all nodes, already need Docker installed, incase this isn’t obvious 😀

root@prod-swarm-manager-1:~# docker swarm init --data-path-port 4788 --advertise-addr 10.129.2.21
 Swarm initialized: current node (p9ojg9edmipi7saldcbrcnhyt) is now a manager.
 
To add a worker to this swarm, run the following command:

    docker swarm join --token SWMTKN-1-42rg6zgs3onagtyamztitzgqb21z9hmwnwfdqoabmew4ppk2i5-2r0upkukt2asdfsdf3234512ad 10.129.2.21:2377

To add a manager to this swarm, run 'docker swarm join-token manager' and follow the instructions. 

And we now have a swarm (with one node) up. Time to add more nodes!

root@prod-swarm-node-1:~# docker swarm join --token SWMTKN-1-42rg6zgs3onagtyamztitzgqb21z9hmwnwfdqoabmew4ppk2i5-2r0upkukt2asdfsdf3234512ad 10.129.2.21:2377
This node joined a swarm as a worker. 

root@prod-swarm-node-2:~# docker swarm join --token SWMTKN-1-42rg6zgs3onagtyamztitzgqb21z9hmwnwfdqoabmew4ppk2i5-2r0upkukt2asdfsdf3234512ad 10.129.2.21:2377
This node joined a swarm as a worker. 

root@prod-swarm-node-3:~# docker swarm join --token SWMTKN-1-42rg6zgs3onagtyamztitzgqb21z9hmwnwfdqoabmew4ppk2i5-2r0upkukt2asdfsdf3234512ad 10.129.2.21:2377
This node joined a swarm as a worker. 

root@prod-swarm-node-3:~# docker swarm join --token SWMTKN-1-42rg6zgs3onagtyamztitzgqb21z9hmwnwfdqoabmew4ppk2i5-2r0upkukt2asdfsdf3234512ad 10.129.2.21:2377
This node joined a swarm as a worker. 

We should now have our swarm up and running – run docker node list, to see!

root@prod-swarm-manager-1:~# docker node list
 ID                            HOSTNAME                 STATUS              AVAILABILITY        MANAGER STATUS      ENGINE VERSION
 p9ojg9edmipi7saldcbrcnhyt *   prod-swarm-manager-1     Ready               Active              Leader              19.03.1
 lnp2b2ijurmtamp0if4aner7y     prod-swarm-node-1        Ready               Active                                  19.03.1
 caxka5zdq0nb9lilcvss1fv82     prod-swarm-node-2        Ready               Active                                  19.03.1
 k0ar3rgjzoz1jjncfpr5xd9t1     prod-swarm-node-3        Ready               Active                                  19.03.1
 oa0ym3ytsgf5svbs2rz205jwr     prod-swarm-node-4        Ready               Active                                  19.03.1

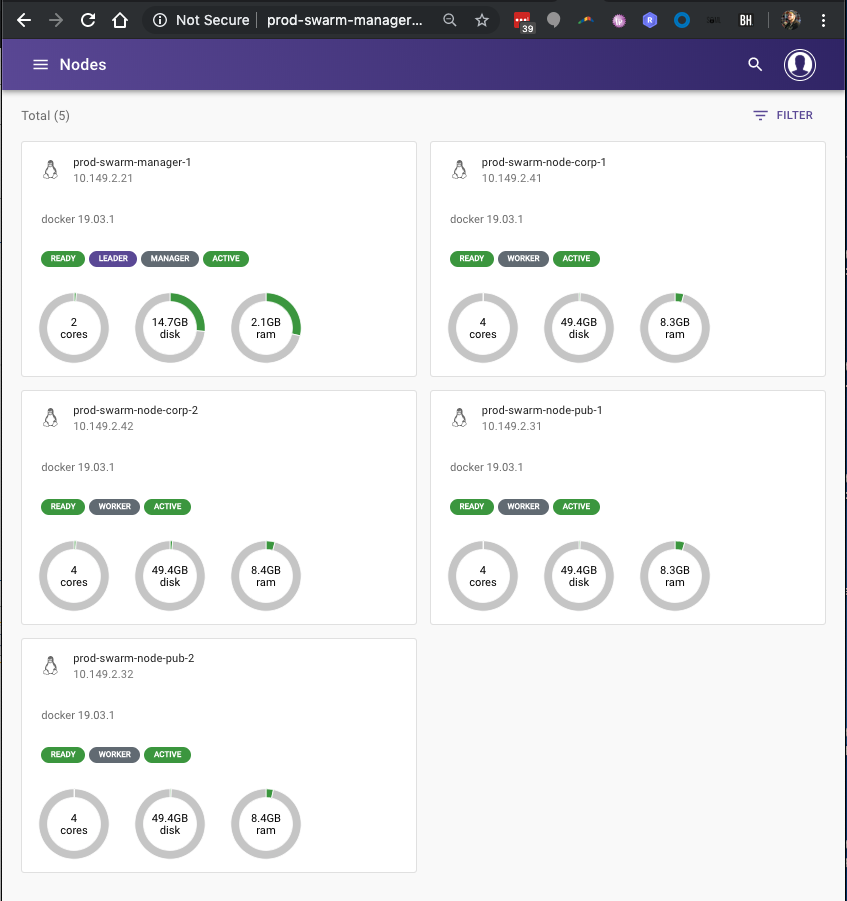
We do, perfect! We now want to manage the swarm with a nice web interface, so lets bring up swarmpit.

root@prod-swarm-manager-1:~# docker run -it --rm \
>   --name swarmpit-installer \
>   --volume /var/run/docker.sock:/var/run/docker.sock \
>   swarmpit/install:1.7
Unable to find image 'swarmpit/install:1.7' locally
1.7: Pulling from swarmpit/install
e7c96db7181b: Pull complete 
5297bd381816: Pull complete 
3a664477889c: Pull complete 
a9b893dcc701: Pull complete 
48bf7c1cb0dd: Pull complete 
555b6ea27ad2: Pull complete 
7e8a5ec7012a: Pull complete 
6adc20046ac5: Pull complete 
42a1f54aa48c: Pull complete 
717a4f34e541: Pull complete 
f95ad45cac17: Pull complete 
f963bb249c55: Pull complete 
Digest: sha256:04e47b8533e5b4f9198d4cbdfea009acac56417227ce17a9f1df549ab66a8520
Status: Downloaded newer image for swarmpit/install:1.7
                                        _ _   
 _____      ____ _ _ __ _ __ ___  _ __ (_) |_ 
/ __\ \ /\ / / _` | '__| '_ ` _ \| '_ \| | __|
\__ \\ V  V / (_| | |  | | | | | | |_) | | |_ 
|___/ \_/\_/ \__,_|_|  |_| |_| |_| .__/|_|\__|
                                 |_|          
Welcome to Swarmpit
Version: 1.7
Branch: 1.7

Preparing dependencies
latest: Pulling from byrnedo/alpine-curl
8e3ba11ec2a2: Pull complete 
6522ab4c8603: Pull complete 
Digest: sha256:e8cf497b3005c2f66c8411f814f3818ecd683dfea45267ebfb4918088a26a18c
Status: Downloaded newer image for byrnedo/alpine-curl:latest
DONE.

Preparing installation
Cloning into 'swarmpit'...
remote: Enumerating objects: 6, done.
remote: Counting objects: 100% (6/6), done.
remote: Compressing objects: 100% (6/6), done.
remote: Total 17028 (delta 1), reused 1 (delta 0), pack-reused 17022
Receiving objects: 100% (17028/17028), 4.39 MiB | 3.05 MiB/s, done.
Resolving deltas: 100% (10146/10146), done.
DONE.

Application setup
Enter stack name [swarmpit]: prod-swarmpit
Enter application port [888]: 
Enter database volume driver [local]: 
Enter admin username [admin]: 
Enter admin password (min 8 characters long): SYJpt6FQ@*j2ztPZ53^yF@!q5VRkZRyr*h$ydWGYE67$RWaHWat5Q$g6#zQtA3q^8QgQeSAMBEPT2^z8t2y#GKb5^X%e
DONE.

Application deployment
Creating network prod-swarmpit_net
Creating service prod-swarmpit_db
Creating service prod-swarmpit_agent
Creating service prod-swarmpit_app
DONE.

Starting swarmpit............DONE.
Initializing swarmpit...DONE.

Summary
Username: admin
Password: SYJpt6FQ@*j2ztPZ53^yF@!q5VRkZRyr*h$ydWGYE67$RWaHWat5Q$g6#zQtA3q^8QgQeSAMBEPT2^z8t2y#GKb5^X%e
Swarmpit is running on port :888

Enjoy :)

And bingo! If I hit up the manager host on port 888, I can login and view the swarm state!

Setting up docker on a new Ubuntu 18.04 server

This is actually fairly simple 🙂

In fact, REALLY simple 😀 Just do the following:

curl -fsSL https://download.docker.com/linux/ubuntu/gpg | sudo apt-key add -
add-apt-repository "deb [arch=amd64] https://download.docker.com/linux/ubuntu $(lsb_release -cs) stable"
apt update
apt-get install -y docker-ce
systemctl start docker
systemctl enable docker 

If you’re running CSF, you’ll want a couple of extra CSF modules installed, namely https://github.com/juliengk/csf-pre_post_sh and https://github.com/juliengk/csf-post-docker

But other than that? Yep, all done 🙂

Changing hostname on Ubuntu 18.04

So we have finally started rolling out 18.04 VM’s for corporate use at work (R1soft finally started rolling ‘non-beta’ modules, which was our main blocker), occasionally I’ll go to run up a bunch of VM’s and munge the hostname of one machine.. With cloud-init, it’s not quite a simple as editing /etc/hostname and rebooting anymore.. But it’s not too bad 🙂

First, edit /etc/cloud/cloud.cfg, and look for the preseve_hostname: field – you want this set to true.

#This will cause the set+update hostname module to not operate (if true)
preserve_hostname: true

Once done, run ‘hostnamectl’

root@prod-docker-manager-1:~# hostnamectl
   Static hostname: prod-docker-manager-1
         Icon name: computer-vm
           Chassis: vm
        Machine ID: 71431bc67882462ab8752997212223e8
           Boot ID: 2523f4f9cc3142b5bf56ad73f93da02e
    Virtualization: vmware
  Operating System: Ubuntu 18.04.2 LTS
            Kernel: Linux 4.15.0-45-generic
      Architecture: x86-64

This will show your current hostname. I guess you don’t need to really show this, it’s handy to know that it IS set as static. If it’s not, you’ll want to go google something 😉

You can now just run ‘hostnamectl set-hostname <newhostname>’

root@prod-docker-manager-1:~# hostnamectl set-hostname prod-swarm-manager-1
root@prod-docker-manager-1:~# hostnamectl
   Static hostname: prod-swarm-manager-1
         Icon name: computer-vm
           Chassis: vm
        Machine ID: 71431bc67882462ab8752997212223e8
           Boot ID: 2523f4f9cc3142b5bf56ad73f93da02e
    Virtualization: vmware
  Operating System: Ubuntu 18.04.2 LTS
            Kernel: Linux 4.15.0-45-generic
      Architecture: x86-64

And you’re good to go. Reboot if you have processes running which depend on the hostname. Or not if this is a brand new host (which is my usual case, where I’ve munged something during the VM install, and am now SSH’d in as the temporary local user to do the actual provisioning).